ANZPL/ANZBL Weekly Recap!

Thanks once again to our beloved CC Napalmer for getting us a recap article for this week's ANZPL and ANZBL highlights. Follow him on Twitch and Twitter to see more great content!

ANZPL Summary

Week Seven of ANZPL Season Four kicks off tomorrow and last week saw a shakeup in the leaderboard, so lets recap all the action with highlights from each matchup to bring you up to speed and get you ready for the games ahead!

South Sydney Skorpions vs Adelaide Action X

Returning to familiar territory, we saw the Skorpions opting for a much more passive defence, with Action X looking to cross CS-63 and Obj 277 down the 1 line to pressure out the island. After getting some bleed on the crossing, the Skorpions regrouped and pushed the hill, taking out Val in the process. With the middle locked down, the Skorpions pushed an IS-4 and S. Conqueror out to the island and outbrawled the flank, setting up the victory without losing a single tank.

Action X challenged the Skorpions to an all-out close-range duel in the second match, with both teams committing two CS-63 to the hill. The focus quickly turned to the 113s in the middle though, with a push into the heavies being executed by the Skorpions while CJ rotated around the hill. As the dust settled, Action X held the hill with a crossfire, but with very little HP to work with. As Saxon looked to rotate, Raspberry managed to rotate to the hill undetected, and with the help of JT managed to retake the high ground and close their second win for the night.

Swapping to Prokhorovka, the Skorpions ran a very unusual strategy, committing all their tanks to the middle of the map! With both CJ’s T-100 LT and Auzzi’s CS-63 committing over the railway line, both took a salvo of damage, with CJ coming out worse off. Identifying that they had the four vs two overmatch in the middle, the Skorpions heavily committed over the middle ridge, wiping out the pair with minimal damage in return. Systematically surrounding the remaining opponents, the Skorpions closed out their defence with a 3-0 lead.

As nature called for JT, the Skorpions rotated in Benny to fill the roster and Action X were ready to capitalise on it. Bringing out the unusual combo of a Manticore and K-91, Action X locked down the 1-2 line, forcing the Skorpions into a 2 flag commit. With the Manticore exposing its position in the South, a dump into Ironguard in the north was bound to happen. Ultimately the might of the Manticore’s Battleship Gun was too much to handle, with Action X picking up a match in the series.

North Sydney Sentinels vs Brisbane Bulldogs

The Sentinels wasted no time on Prokhorovka, utilising Rainbow’s T-100 LT to aggressively flush out his doppelganger MadHouse. With the firepower of the Strv punishing him hard, MadHouse went up in flames in the first minute of the game, putting the Bulldogs in a tough position to gain information. Attempting to salvage the game, the Bulldogs eventually put pressure on the two flag but the sheer mobility of the T-100 LT allowed the Sentinels the ability to get reset shots at any time, and allowed them time to dismantle an Isolated AVP to gain a significant numbers advantage and the first win.

Now on defence, the Bulldogs committed a T-100 LT and Bat-Chat to the hill, looking to defend the two flag primarily. The Sentinels identified that the Bulldogs were not defending the middle ridge and quickly secured A2 at the cost of a few shots of HP. Rotating Rowendy onto the one flag, the Sentinels applied pressure but did an unexpected rotation at the same time onto the hill with an IS-7 and the T-100 LT. The Bulldogs held on with MadHouse getting some great reset shots, but was eventually taken out, putting the Bulldogs in a rough position to get resets. A swift push on the hill took out TheReturned, and gave the Bulldogs some much needed map control. Cows managed to get a lot of damage onto Rowendy who at this point was shielding Rainbow in the hope they would cap out but the flank managed to secure Sentinels’ fate.

With the score 1-1, the teams moved to Ghost Town. The Sentinels opened with an unusual northern push and managed to get early information regarding Dark’s location. Realising the fight wasn’t in the north, the Sentinels rotated back into defensive positions near the two flag, with Rainbow moving to the 1 line to flush out a potential Batchat flank. MadHouse got a great clip onto Rowendy but the sudden charge of Rainbow caught him off-guard, forcing a retreat which resulted in his tank’s destruction. Looking to not lose too much control, the Bulldogs pushed three tanks onto the two flag, losing a lot of HP on the way. With five thousand more HP to play with, the Sentinels kept their cool and despite getting pushed managed to trade evenly before swarming and eliminating the remainder of the Bulldogs.

Now on the attack, the Sentinels charged two turbocharged IS-7s north into the A4 high ground and applied triple capture pressure with the remainder of their team. Utilising the buildings on the circle as cover, the Sentinels were difficult to reset and all hopes were dashed when Rainbow and TheReturned charged down to run interference when the timer got close. The Bulldogs with their entire team caught on rotation were entirely unprepared for this and were unable to get a reset, allowing the Sentinels to secure a speedy victory.

Perth Panthers vs Christchurch Conquerors

Going into this series at the bottom of the leaderboard, the Conquerors at the top were an intimidating foe for the Panthers. Opting for a heavy lineup, the Panthers looked for a static defence in the middle of the map with a WZ-111 5A and CS-63 to provide supporting fire. Conquerors made an aggressive push on the 2 line, but Panthers rotated quickly on the E line, eliminating Whippet. LightningMan showed great survival skills in a one vs two situation, stalling for long enough to receive supporting fire from his team, taking out Bluey’s Batchat and trading his WZ for an Obj 277. The Conquerors attempted to repush the F3 ‘bowl’ before the CS-63 arrived but ultimately the numbers proved too strong as Panthers scored the defending victory.

Swapping sides, the Panthers managed to punish out Bluey’s T-100 LT on the railway line and took early map control. The Conquerors opted for a very aggressive push down the seven line, which backfired horribly when they got caught in crossfire.from the hill. Getting a kill on twoplustwo, the Panthers pushed over the middle into MerryTurnipDay and secured an attacking win without losing a tank!

Looking to cause an upset while leading 2-0, the Panthers opted for a Superheavy defence. This forced Conquerors to play slowly in order to not run into an ambush. Whippet managed to spot Twit's IS-7 rotating on the A line and retreated before taking any damage. With the IS-7 out of the main fight, the Conquerors looked to pressure the two flag which quickly evolved into a close-range brawl. Some slight hesitation let the Panthers rotate their fifth back into the blob and made it incredibly difficult for the Conquerors to advance without taking damage. Splitting their forces to set up crossfire managed to level the HP but Panthers quickly pushed as a team into unprotected Bluey and twoplustwo. Some intense point-blank brawls saw both teams lose tanks which concluded with a two vs one favouring the Conquerors. Despite being down HP, the Conquerors managed to use the Bat-Chat’s clip to swing the HP back in their favour and finally got a win on the board, even if it was extremely close.

Regaining their mojo, the Conquerors spread out on defence, to cover all approach angles.The Panthers methodically seeked out information to the Conquerors setup and grouped towards a push at D7 with 2 cap pressure. Setting up a trap at D6, the Panthers waited for the Conquerors to attempt a reset. Bluey and Trax got resets from the southern entrance to the capture circle but this triggered an all-out push by the Panthers into the pair. Even an ignite from Whippet’s AMX 50B wasn’t enough to stop this pain train and the Panthers once again made history with an upset victory.

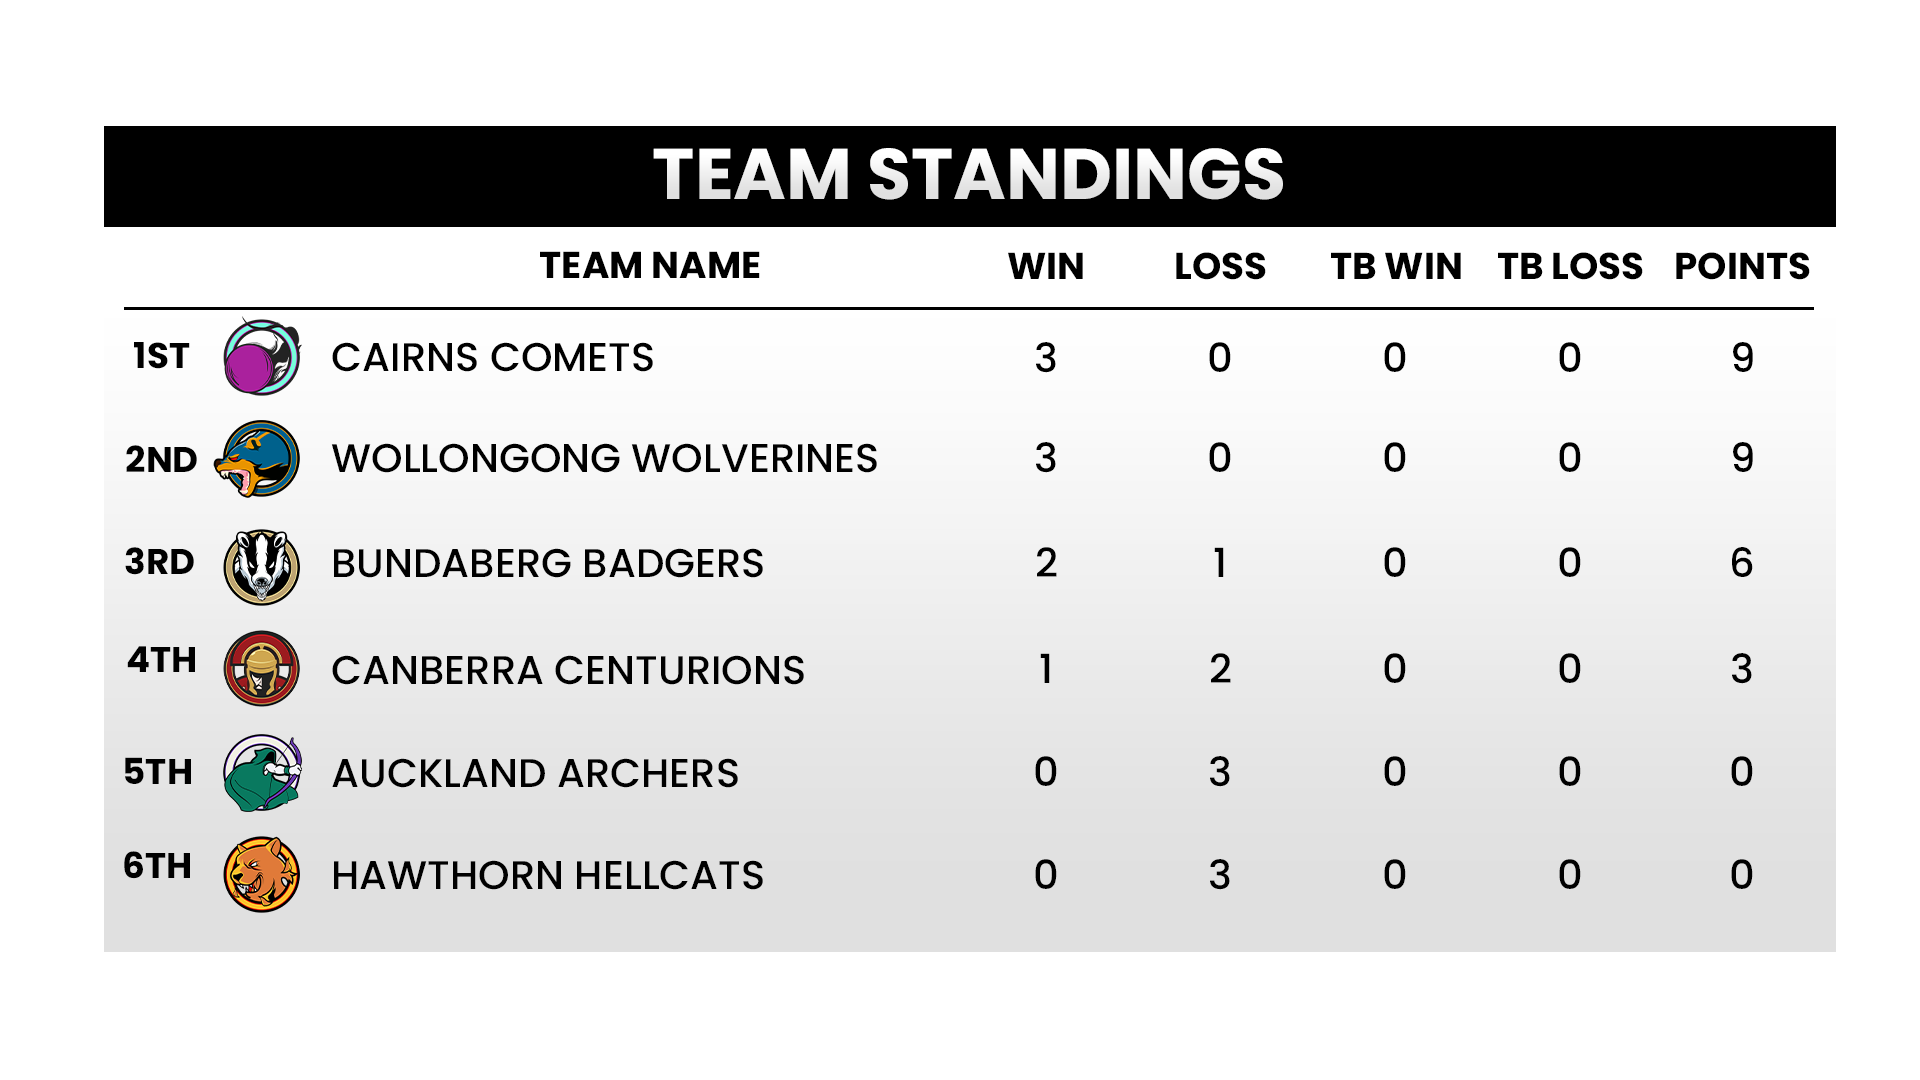
Week Six Leaderboard

Weeks Six sees the Sentinels in the top spot with the Skorpions hot on their heels while the Conquerors drop to third after their loss to the Panthers who now take fourth place!

Upcoming Matches

Tomorrow's matches will see the Conquerors up against the Bulldogs followed by the Panthers facing off against the Skorpions and lastly the Sentinels going head to head with Action X.  

Watch here  

Fanstasy League Team of the Week

For our avid ANZFL fans, here is the best performing team of five for week one with a maximum of 1,436.2 points based on a starting lineup of five. Don't forget to create your team for tomorrow's games!

Create your team  

ANZBL Summary

Cairns Comets vs Bundaberg Badgers

Starting off with a bang was a clash of the titans between two previously undefeated teams.

With Comets on attack, a double IS-7 was used to get information as to where the Badgers were setting up. After rotating to town undetected, the Comets pressured the two flag, forcing a rotation from the Badgers. The Comets identified that the Badgers were split and a great push took out Snoozle, with the rest of their opponents falling like dominos. 

Swapping sides, the Badgers opted for a very unusual tactic - double T110E3s! However, with the Badgers lacking mobility and facing a strong resistance, Pp_Power made a great rotation through the south to restrict the Badgers to a quarter of the map. Covering all the approaches, the Comets detected the herd migration early and quickly rotated their forces to surround the Badgers as they pushed onto the two flag. With the Badgers unable to counter-push with their lineup, the Comets looked confident securing their second win for the night.

Under pressure to get a win, the Badgers looked for a very static defence on Murovanka. The Comets utilised a Bat-Chat to try and get map control but overcommitted two Kranvagns into the E line, resulting in a push from the Badgers catching out AthrunZulla. After rotating two Kranvagsn to take out an isolated S. Conqueror, the Comets found themselves without crossfire and without HP, granting the Badgers a victory in the end.

In the final game, the Badgers made a very aggressive attack onto the one flag with two Kranvagns, but this time they had the rest of their team ready to give supporting fire. Identifying the Bat-Chat was out of the fight the Badgers pushed hard, taking out rupro but letting Pp_Power escape on very low HP. This proved to be a devastating mistake as a crossfire of Kranvagn was now set up and the Comets were able to instantly delete BadBoiBubbles as soon as he poked to get damage. Despite being down a lot of HP, the Comets kept their cool and utilised their crossfire to punish every push the Badgers made, granting them the 3-1 overall victory.

Auckland Archers vs Wollongong Wolverines

Kicking off on Cliff, the Wolverines took early hill control on attack with two CS-63 and identified the Archers were not contesting the middle of the map. After rotating two Obj 277 to the two flag and applying pressure, the Wolverines tried to rotate their Kranvagn for a cheeky flank. The Archers punished this hard and wiped out the lone tank while the Wolverines scrambled to unflip haha_yes as he paid tribute to Team Efficiency. Zealblade suddenly got overconfident, pushing up to the middle of the map and was swiftly executed by a great push by the Wolverines, followed by heavy bleed onto the sniping Obj 140. A super close end-game saw a huge brawl on the two flag, but when the dust settled, the Wolverines secured the victory.

On defence, the Wolverines opted for a very unusual passive defence, utilising a Leopard 1 for sniping and a Maus to slow down a 1-2 push, getting a great amount of bleed on the hill crossing,but Barricade was able to get up unscathed. However, with their Leopard spotted out and their Maus ‘flanking’, the Wolverines found themselves in a tough position when the push arrived. Despite this, the Archers were unable to translate this into a victory due to losing too much HP early on.

With the hot wind blowing over the dunes of Sand River, the Archers looked to refine their defence strategy with an Obj 268/4 instead of a T110E3. The Wolverines swiftly took map control and methodically began to pressure the one flag. The Archers fought back by diving two tanks into a lone haha_yes, forcing the Wolverines to make a push at the same time which was uncoordinated, resulting in a second tank being picked early. The Archers held on well and finally got a point on the scoreboard.

Looking to keep the momentum going, the Archers tried a very aggressive push through the north into A7, at the cost of some HP. The Wolverines realised the potential to get a pick and pushed over the dunes to wipe out 13bladez before getting back into cover and punishing the Archers' repush. Lacking HP and positions, the Archers were slowly picked apart by the vulture swarm of Wolverines, giving them the overall victory.

Canberra Centurions vs Hawthorn Hellcats

Match one saw the Centurions set up with a fairly typical defence but the double MT in the north got great punishment on a crossing S. Conqueror making it anything but ordinary! The Hellcats tried to claw back, pushing two Obj 277s to take out the pair but being spotted out early gave the Mediums enough time to run and set up a crossfire. With a lot of HP being bled, the Hellcats had no choice but to push into the trap and were unsuccessful in getting a foothold with the Centurions taking an early lead.

Charging into their attack, the Centurions sent two CS-63 along the A line and two Kranvagns to the dunes in the middle of the map. As the Hellcats began to reveal that most of their forces were in the north, a lone S. Conqueror proved too tasty a target for Toddy and StiFe, pushing over to eliminate it from the game. Grouping up, the Centurions pressured the north, leaving the Hellcats in a panicked retreat. With the north secured, Centurions placed three tanks on the two flag and managed to successfully capture the base for their second win of the night.

Moving to the fields of Prokhorovka, the Centurions made a return to Season One of ANZPL by using a Strv 103B in A0 on defence. The Hellcats looked to play the eastern side of the map but ended up burning a lot of time trying to gain information on the western side with their T-100 LT. With the T-100 LT starting to capture with less than two minutes to go, the Centurions managed to get an easy reset shot as the Strv systematically farmed out the entirety of the Hellcats to secure the victory for the Centurions again.

With the Hellcats now defending, they looked to get at least one victory for the night by running a very standard defence. However, despite seeing the rotations by Centurions towards the two flag, the Hellcats stood firm, getting great damage onto an over-peeking CS-63. The Centurions grouped up and pushed together to take out Mantank’s STB-1 before applying cap pressure as the 60TPs pushed over to provide HP resistance. Hellcats finally got the memo that they needed to rotate but with Centurions ready, Harty got obliterated crossing through the fields, shortly followed by his team-mates.

Leaderboard

We're after the half-way point now for ANZBL, and with only two matches left before play-offs, the favourites are starting to assert themselves in dominant positions in making a solid play-off run, and put them in good stead at competing for the chance to be promoted into the PL.
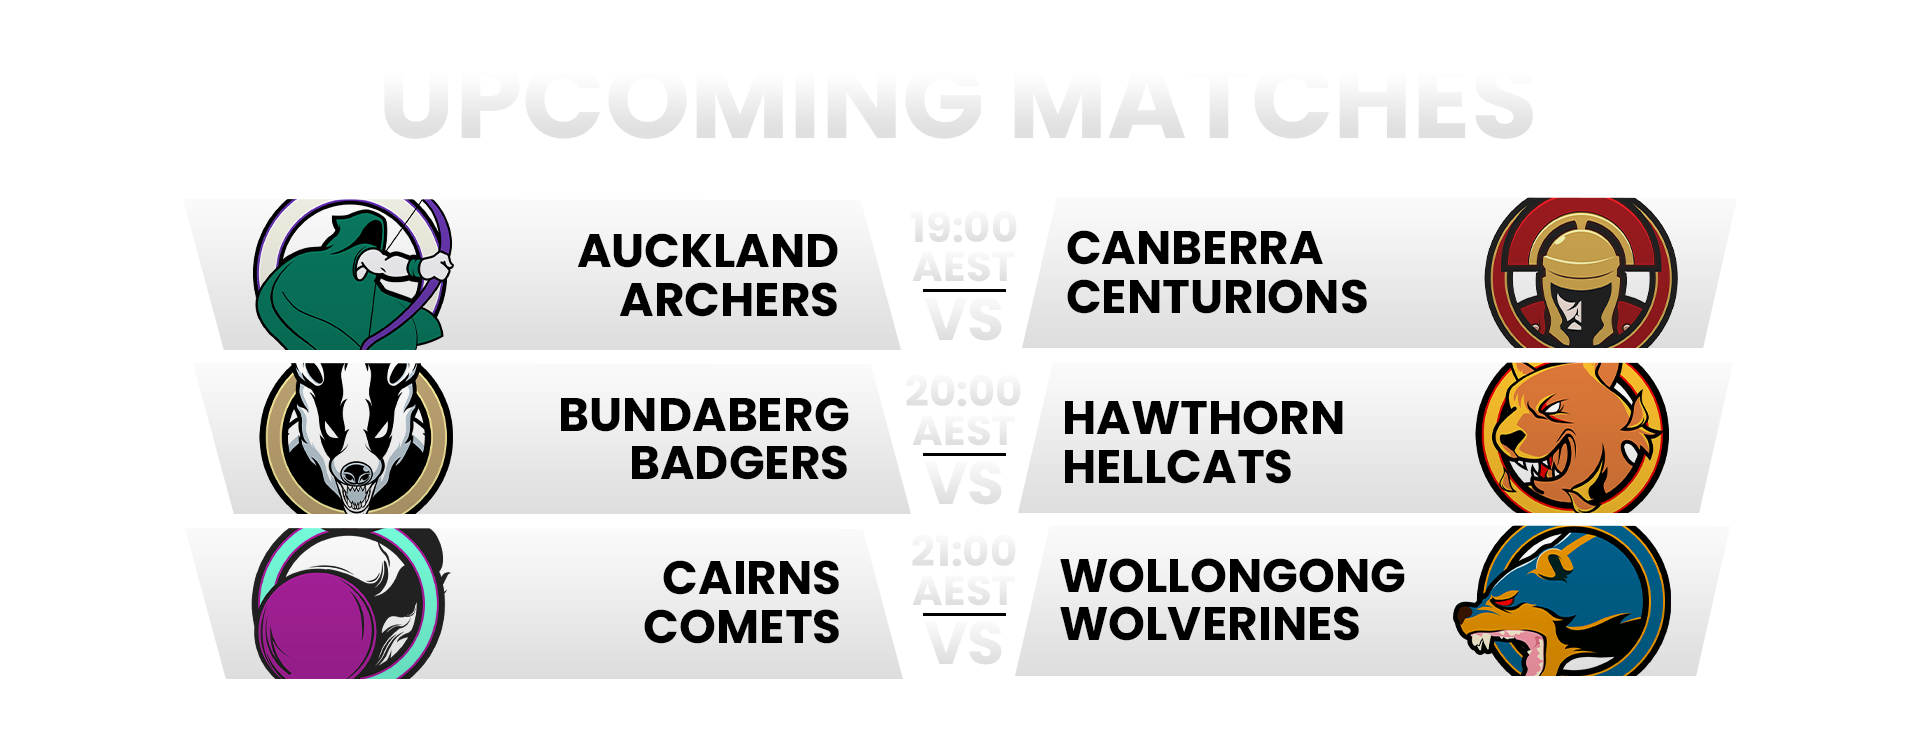
Upcoming Matches

The Archers will be looking to see if they can score their first series victory against the up-and-rising Centurions.

Similarly, Hellcats will try to grab a victory and climb up the leaderboard, however, the Badgers have been bitten once and will be looking to bounce back from their defeat last week as well.

And we've got the titans clashing as our final match of the night, with both the undefeated Comets and Wolverines facing off against each other to see who will remain undefeated towards the closing stages of this season!

Close