This week saw the debut of Season 3 of the Bigger, Badder, Burlier than ever ANZ B League! With a smorgasbord of fresh new talent ready for some action, this Season looks set to be better than ever.
Match One: Bundaberg Badgers vs Auckland Archers
The Archers wasted no time on Murovanka, committing their entire team to the 1-cap. Unfortunately for them, the Badgers were ready to punish the crossing and with some swift rotations were able to shut down Archers’ cap attempt in one fell swoop.
Game 2 saw the Badgers running a very similar tactic, but with faster tanks such as the VZ 55 and Obj 277, they reached the cap circle much faster and put a lot more pressure on the Archers. Relying on Taney_Local to get reset shots, Kiwi_Nightmare was forced to rush in with Rameka when Taney was forced to retreat from a pushing Obj 140. The Badgers were once again ready for this and punished the Archers hard, taking them to a 2-0 lead.
Moving to Cliff, the Badgers opted to run a very heavy lineup focusing on DPM and despite being on the defending side, they pushed straight through the middle of the map. The Archers replied by pushing Phantom_Yamato on the hill, but blundered after giving up the high ground to get their HP into the fight. With the HP firmly in the Badgers’ favor, they swiftly wrapped up the remaining enemies and secured their third victory for the night.
Desperately trying to get a single point on the board, the Archers opted for a very static defence. However, the Badgers got a good early HP bleed, and although they didn't spot the rotation on the 9-line, they realised the over-match and committed to the push before the flanking Obj 277s arrived.
Click here to see the match results!
|
|
4 : 0 |
|

Match Two: Wollongong Wolverines vs Canberra Centurions
The Centurions went into Game 1 on Prokhorovka with a major disadvantage—they only had four members in the game! This made it incredibly difficult for them to get early information, so the Wolverines were able to conceal the position of their Badger and Super Conquerors. Ultimately when the Centurions pushed into the 6-line, the Wolverines were completely prepared. Despite losing an IS-7 initially, they were able to farm out the remaining enemy vehicles to pick up the first victory.
With the Centurions still lacking a fifth member, the Wolverines pushed aggressively into the 1-2 line. Despite bleeding a lot of HP, their strong middle presence was able to keep the pressure up with a decisive pick on Soltarian in the Super Conqueror, swinging the HP significantly in their favor.
Murovanka saw the Centurions pushing two Kranvagns onto the base to apply pressure. But between a T-100 and VZ-55 flank that gave the Wolverines easy resetting shots and their solid double Super Conqueror defence preventing a re-push, it was a slow dismantle of the Centurions' capture attempt that secured the overall victory for the Wolverines.
The Wolverines brought a very unusual lineup on their attack. Two T110E5s, an IS-7, a Batchat 25t and… a Foch B!? With the two E5s on the 1-cap applying pressure, Toddy and Mirras provided great reset shots, forcing the Wolverines to close the distance with their Foch B and Batchat. Ultimately, still lacking a tank hurt the Centurions a lot, and after the Foch B was able to clip out the Super Conqueror, the Wolverines secured a comfortable capture and a 4-0 victory.
Click here to see the match results!
|
|
4 : 0 |
|


Match Three: Hawthorn Hellcats vs Cairns Comets
Game 1 saw the Cairns Comets make a methodical advance through the south and middle of Tundra, getting some great damage onto Gatekeep3r’s Super Conqueror. With the Hellcats unable to punish the VZ. 55s on reload, Harty was their next victim, and their 5v3 advantage helped them keep the momentum going for a decisive attacking side victory.
With the Hellcats now getting the chance to attack on Tundra, they opted for a very slow strategy, attempting to get any bleed possible on isolated enemy tanks. However, their mistake was attempting to capture the base with a single tank before the VZ. 55 took A3 to provide cross-fire. The Hellcats were caught on rotation, and the Comets once again steamrolled their VZ. 55s into their opponents, taking out the rest of the Hellcats and utilising their tank numbers to create a solid victory.
Match point on Sand River saw the Hellcats opting for a very unusual strategy. Taking two Batchat 25s and a STB-1 to the south, they looked to get an early pick on Darkknight’s Batchat and relied on two Super Conquerors to defend the rest of the map. Darkknight, after being spotted early, sensed danger and led the Hellcats on a wild goose chase through the sand dunes. Meanwhile, the rest of his Comets teammates swiftly moved onto the 2-flag and forced the Hellcats to push into an ambush. Despite getting some great damage on rupro, a great block from AthrunZulla denied any reset attempts, and the Comets capped their way to a 3-0 victory.
Now on the defending side, the Comets opted for a very typical defence strategy, focusing on tanks with good gun depression angles. The Hellcats appeared to have a lot of ideas for an attack but couldn’t decide on one and split their forces drastically. With two tanks in the north, a light tank capturing the southern base and a STB-1 out of the fight, the Comets saw a potential overmatch in the north and swiftly pushed in with their double STB-1s, securing the 4-0 with ease.
Click here to see the match results!
|
|
0 : 4 |
|


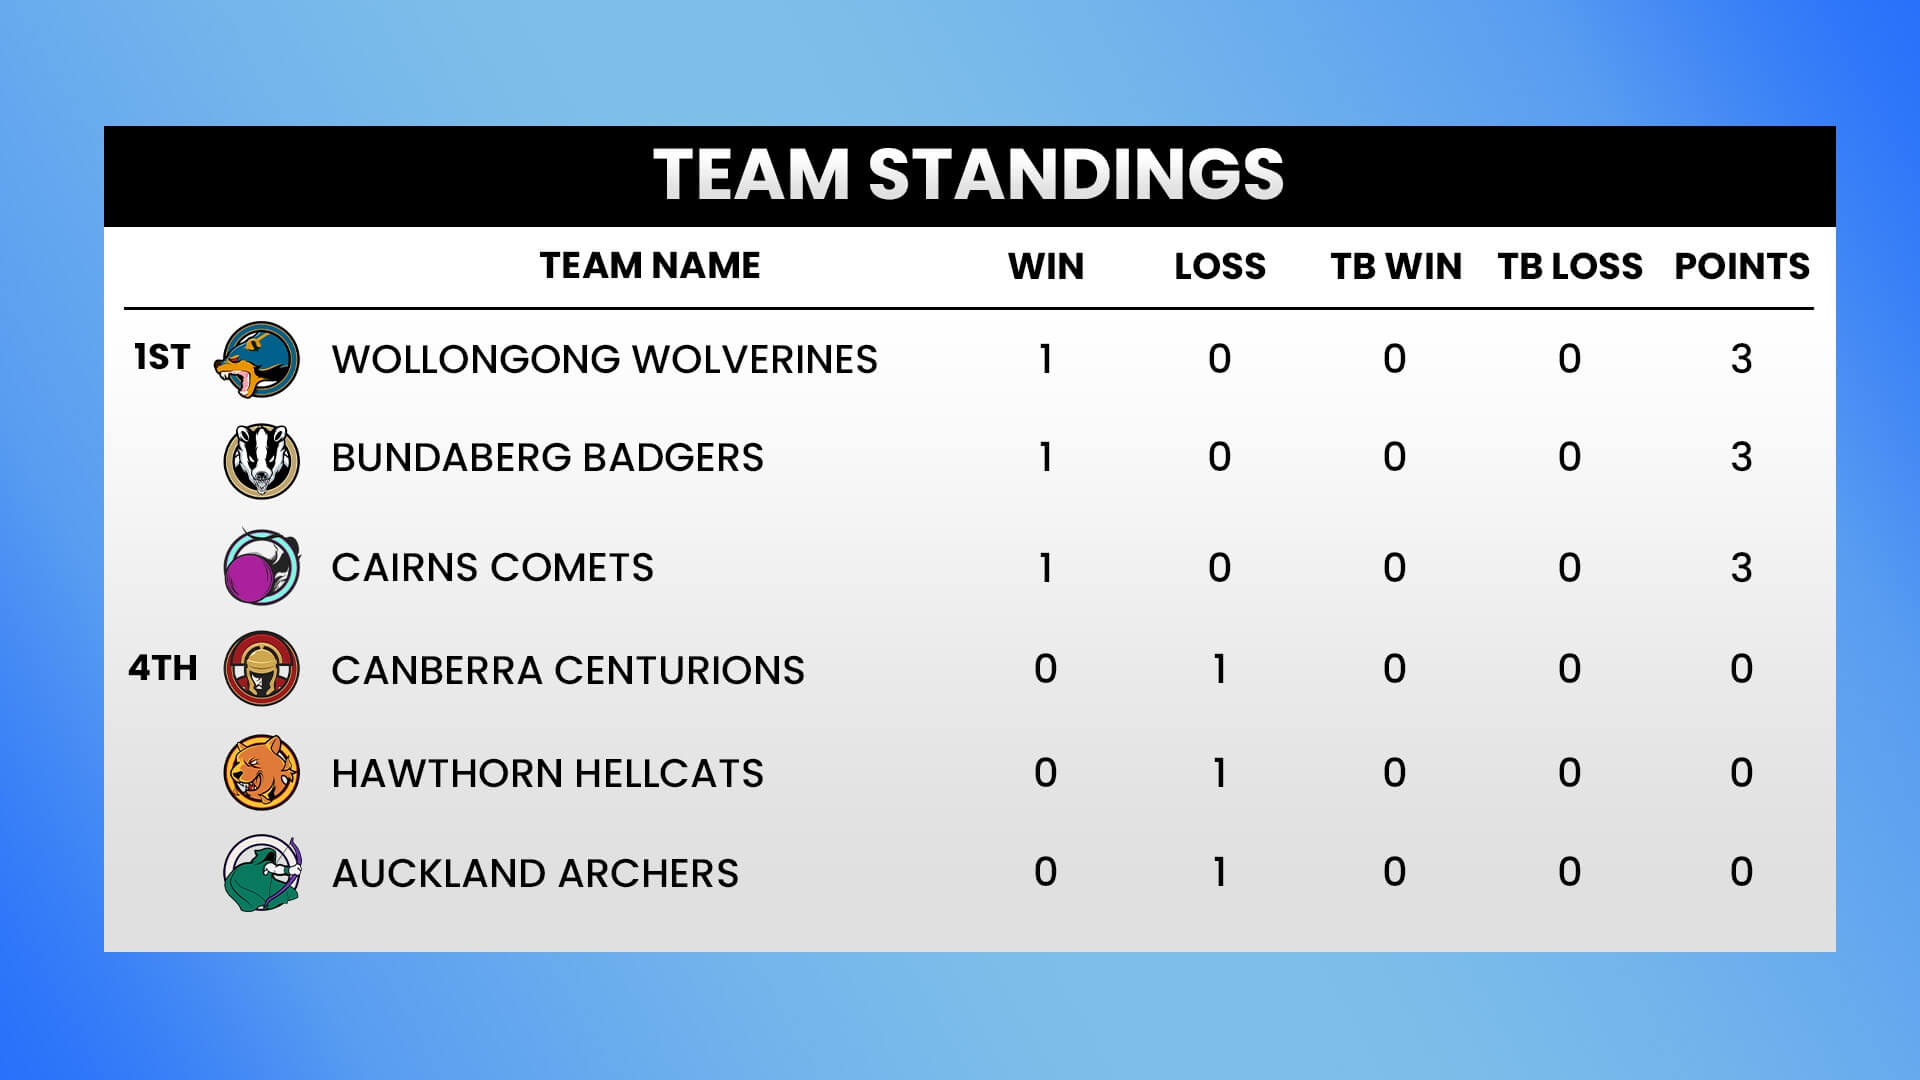
Leaderboard
If you've missed all of Week 1's action, you can check out the entire VOD here in it's glory (no Drops though):
Overall, this week saw three fantastic new teams rise to the top of the leaderboard in ANZBL and set the standard for the new season. Can they keep up their momentum next week, or will their opponents strike back and upset the standings?
Roll out!