ANZPL Summary
Week 5 of ANZPL marks the halfway mark of the new double round-robin format so with the pressure on all teams to get victories on the board, here’s how the matches panned out!
Match One: Christchurch Conquerors vs South Sydney Skorpions
The Conquerors elected to pick Tundra this week and certainly had a few surprises in store. With a T57 Heavy ambush waiting at A1 and a M-V-Y pushing 1 line early to get information, the Conquerors prepared a defence focused on the 2 flag with rotations ready to protect the 1 flag if required. With the 1 cap siren wailing, the T57 sprang into action while Bluey and KritaKil executed a great push taking out one of Skorpions’ tanks in one swift blow, starting the domino chain to a 1-0 victory.
Now on the attack, the Conquerors got a few blind shots in the north before committing heavily to a south push which caught Skorpions off-guard. A lot of accurate shots punished the re-pushing heavy tanks across the bridge and despite getting a few resets, the significant bleed of HP was a thorn in Skorpions’ side as they found themselves getting swarmed. Even a fire on Whippet’s UDES 15/16 wasn’t enough for the Skorpions, resulting in a 2-0 finish.
Match point returned us to the familiar streets of Himmelsdorf, with the pressure now on the Skorpions to win both their games to avoid a loss to the current leader board champions. Setting up an ambush, the Conquerors opted to bring a double IS-4 and double T57 heavy to cover the 8 line ‘Banana’ and punish any potential push. Skorpions flipped the tables by committing towards the 1 flag and forced out the rotation instantly. After getting some great bleed on the IS-4s, the Skorpions made a decisive push onto them when the T57s attempted to get shots on the base. With three autoloaders out of the main fight, the Skorpions were able to clean up and finally get a point on the board.
Now on the defence, Skorpions brought all their tanks to the 1-2 line early to punish any crossing by the Conquerors and that’s exactly what ended up happening! As KritaKil and Joeattora crossed their Obj 277s, the Skorpions punished them hard and managed to knock out one with the latter being heavily damaged and forced to run away. Desperately trying to salvage the game, the Conquerors looked to tried to eliminate Napalmer’s IS-4, however with the punishing combo of the T110E3 and Obj 705A’s alpha damage onto Bluey forcing a retreat, the Skorpions pushed their way to a victory, levelling out the scores.
This week saw Cliff as the tiebreaker and Skorpions with the faster attack opted to pick the defending side. Conquerors opened with a hyper aggressive 2 line push with double Obj 277 and CS-63, with a AMX 50B to support. Russian and Night were prepared and were able to get significant damage onto Bluey’s CS-63 as he climbed the hill. With MerryTurnip’s STB entering the fight, the Conquerors were able to trade one for one, eliminating Auzzi before grouping for the push onto Napalmer after spotting JT’s rotation. After a lucky ignite onto the T110E5, and a missed shot by Night, the battle evolved into a 2v1 favouring the Conquerors. Russian without fear proceeded to charge the 1-shot JoeAttora. With the first shot missing and the second low-rolling, Skorpions no longer had the clip potential to take out Whippet’s AMX 50B. Narrowly escaping the clip, Russian proceeded to dance around the rocks while on reload. Dodging shells, Russian pulled off the impossible and managed to secure the kill, bringing Skorpions their well-earned reverse sweep.
Click here to see the match results!
|
|
2 : 3 |
|


Match Two: Adelaide Action X vs Brisbane Bulldogs
Action X opened on Tundra by sending all their tanks down the 2 line to protect the 2 flag. Bulldogs identified this and applied pressure to the 1 flag, which forced Action X to rotate back to defend. Getting some great bleed on the cross, the Bulldogs rotated MadHouse in from the south to pressure out an isolated Saxon, trapping action X in a crossfire should they try and push out. MadHouse continued picking apart low HP targets in his Batchat 25t and brought the Bulldogs to an early lead in the series.
Game 2 saw the Bulldogs on defence, with Action X making a much slower advance, trying to get information about where the Bulldogs were located. This time the fight occurred on the 2 flag with 3 tanks aspplying capture pressure, forcing the Bulldogs to commit Buck3t and MadHouse to get resets, ultimately leading to MadHouse being knocked out. With the crossfire and HP in their favour, Action X surrounded the remaining few tanks and closed out the score 1-1.
Moving to Mines, Action X opted for an aggressive defence, committing two CS-63s to the top of the hill with an IS-7, Obj 277, and a Kranvagn to give supporting fire. The Bulldogs managed to cross Dark down the 1 line without taking much damage and began giving supporting fire as the double 113s started capturing the 2 flag. As the timer ticked down, Dark lost a lot of HP and a few last-second resets kept Action X in the game. With a close duel between AVP and Saxon in the north at the same time as Dongerlord committing to kill Dark, a minor overcommitment by Val to get reset shots saw Action X’s HP lead drop significantly. Despite this, a great pick onto AVP swung the tank advantage into Action X’s favour and an unlucky ammo rack onto Buck3t left MadHouse in a 1 v 3 situation where he couldn’t catch the remaining Bulldogs, giving them the defensive side victory.
In direct contrast, the Bulldogs opted for a very static defence and didn’t contest the hill at all. The two tanks on the island provided great supporting fire, but an aggressive train of double CS-63 and IS-7 charging at them started to dislodge their positions. Despite this, Bulldogs got some great bleed, knocking out Dongerlord and Saxon’s CS-63s. A cheeky flank by Dark in the north turned disastrous as he opted to rush towards CJ on the island instead of Val on the hill, putting him in a difficult crossfire between two fully aimed heavy tanks. With Val rotating off the hill, the pair proceeded to rush Dark down and jump onto the 2 cap. Ironguard ran great interference in the south vs MadHouse but with Cows over-extending for resets, their HP eventually ran out giving Action X the 3-1 victory.
Click here to see the match results!
|
|
3 : 1 |
|
_180x.png)

Match Three: Perth Panthers vs North Sydney Sentinels
A Panthers vs Sentinels showdown was what the crowd wanted to see, with the Sentinels out for revenge after losing in the Season 3 Playoffs to the Panthers. Straight out of the gate, the Sentinels pushed hard through the 1-2 lines of Himmelsdorf practically uncontested, getting two E 100s into F1 completely uncontested. With the double IS-4s joining one on the cap, the Panthers were caught on rotation and forced to make poor trades to reset the timer. While the Panthers fought tooth and nail to avoid getting capped out, the HP bleed caught up with them and trapped them into positions where they couldn’t cover LightningMan. With so little HP left, the Panthers made a final gambit to take out Rainbow which backfired, resulting in Goober getting taken out. In a 1v2 with little HP and cover, Twit was surrounded and quickly taken out, giving the Sentinels the attacking side victory.
With Panthers now on the attacking side, they opted to send all their tanks over the hill in a bid to push towards the 2 flag. Sentinels opted for a very aggressive double AMX 50B defence on the 8 line ‘Banana’ which resulted in two connecting shots onto Goober as he crossed onto the circle and halted the rest of the Panthers in fear. Syndy managed to cross into the circle and got a great reset shot on Goober, forcing Panthers to make an aggressive rotation onto the supposedly isolated Super Conqueror. This ultimately turned into a massive crossfire trap with Rainbow and DeL farming out Dastardly on the crossing before retreating away while on reload. After taking out TheReturned, Panthers desperately looked for another pick and managed to successfully take out Syndy, however with the 50Bs in position and fully reloaded, the Sentinels were able to get great burst damage out, even if Rainbow did go down swinging in the process. JS was able to get a last-ditch ignite onto DeL, however this was just delaying the inevitable as the Panthers did not have the speed or time to clean up the defence.
On a winning streak, the Sentinels moved to Prokhorovka with a cautious attack. Using the T-100, the Sentinels realised quickly there wasn’t much defending the 1-2 line and so committed an IS-7 straight to the hill with a second not far behind. With the pair able to bleed out the Panthers’ rotation, the HP swung drastically in their favour and with the T-100 flanking and double S Conq dumping into middle at the same time the double IS-7 dumped off hill, Panthers didn’t have the guns nor the HP to farm either push effectively, leading to a comprehensive victory for the Sentinels.
With their victory secured, the Sentinels opted for a different style of defence, bringing a Badger, Jag E100, Kranvagn, Leopard 1 and T-100 LT. With nobody contesting the middle, LightningMan managed to sneak his way down the 6 line bushes and spotted Rowendy's Kranvagn, which instantly evaporated. Panthers made a great rotation onto the 7 line and managed to shred 1900 HP off Wym0’s Badger as soon as it was spotted with a Batchat securing the kill. With three of Sentinel’s tanks out of the fight Panthers capped out for the victory, proving that despite the loss, they are still a formidable force in the ANZPL.
Click here to see the match results!
|
|
1 : 3 |
|


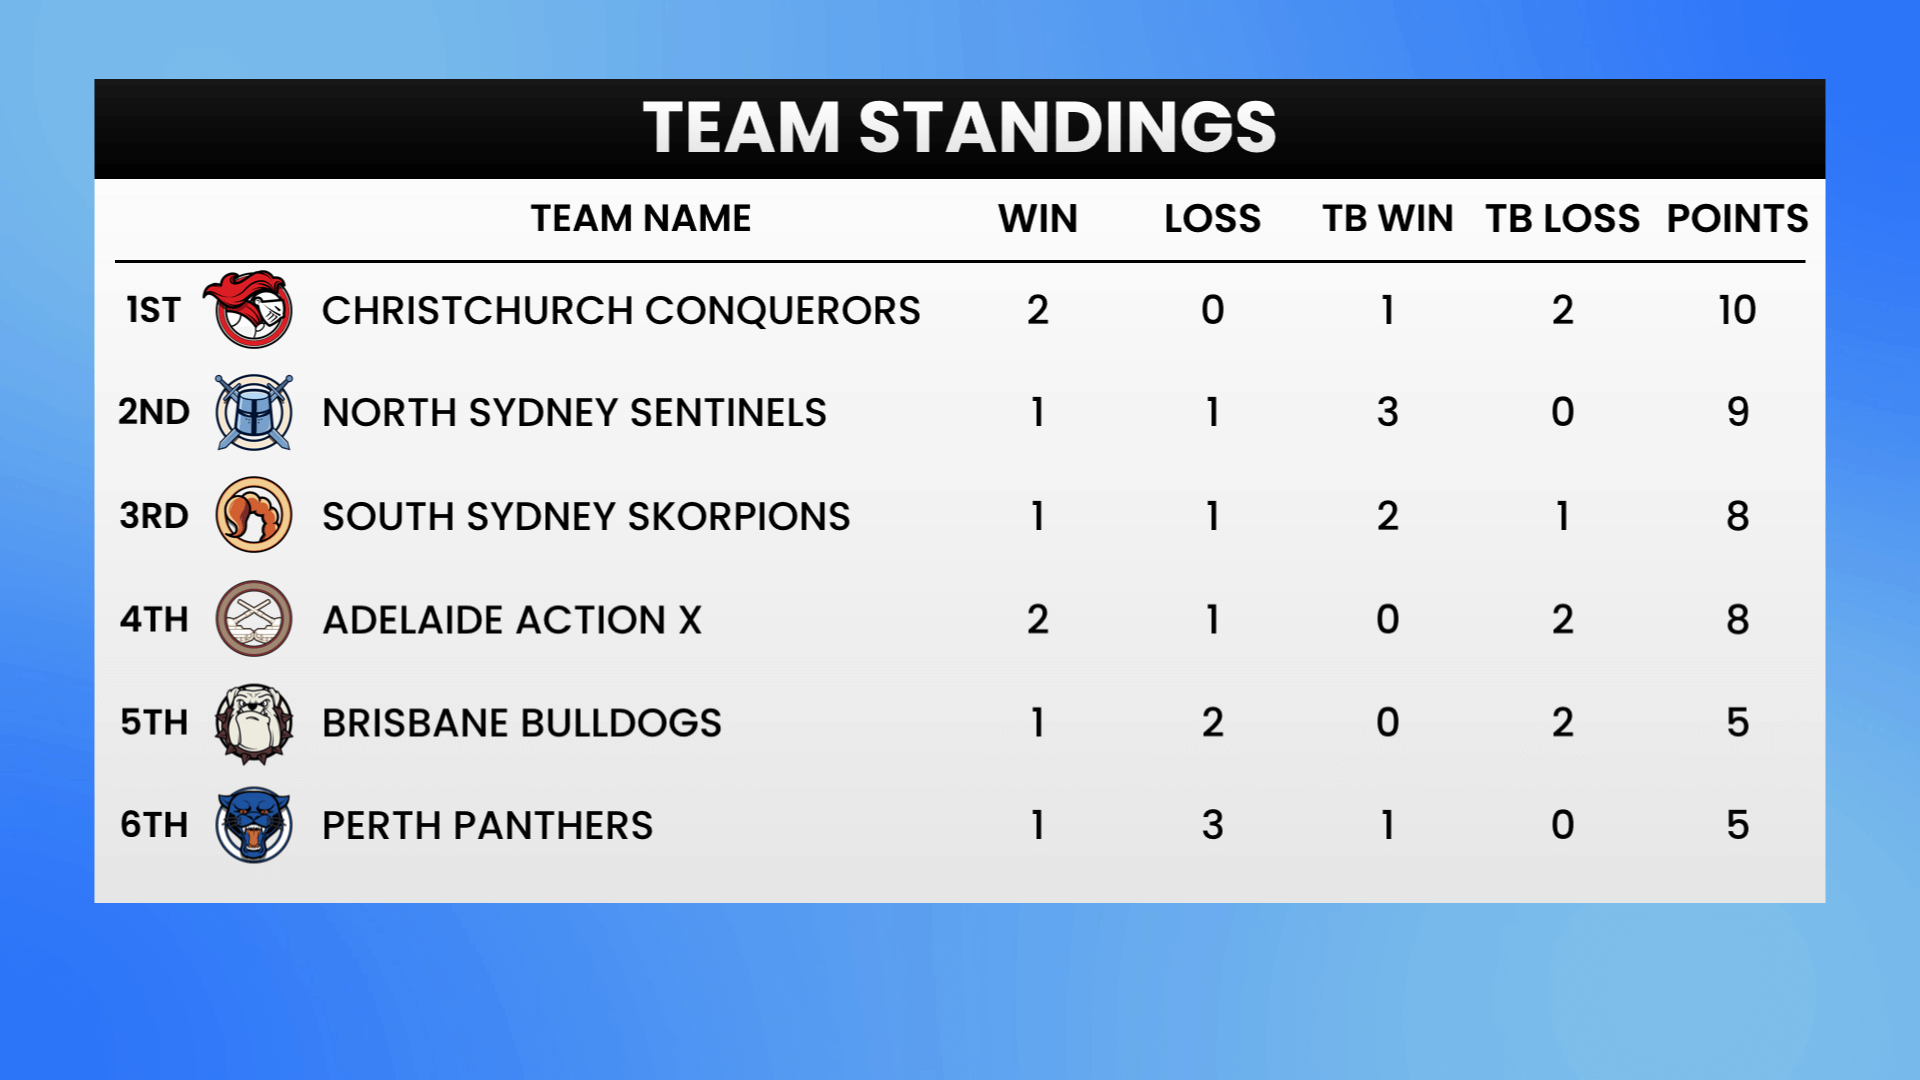
Leaderboard
If you've missed all of Week 5's action, you can check out the entire VOD here in it's glory (no Drops though):
As the dust settles after another week of ANZPL, the Conquerors barely remain on top with the Sentinels hot on their heels by one point followed by the Skorpions and Action X another point behind. Although the Bulldogs and Panthers are behind, with the second round of the Round Robin coming up, every team is still in contention as we just pass the half-way point.
ANZBL Summary
With the conclusion of Week 2 of ANZBL let’s check in and see what our teams got up to and who came out on top.
Match One: Auckland Archers vs Cairns Comets
Starting off the night, the Archers were on Defence on Prokhorovka and opted to heavily defend the eastern flank. Some early spots from Chegar in the Obj 140 caught out Pp_Power’s Batchat and forced him to retreat. Meanwhile Darkknight’s T-100 cleared the 1-2 line, giving Comets the information as to the location of the Archers’ tanks, apart from a single Kranvagn. Placing Rupro’s IS-7 on the 1 flag, the Comets set up a crossfire and threw down the gauntlet, awaiting a response from Archers. Archers replied by sending Rameka and Road_Riot over the rails to get resets, at the cost of a lot of HP. Rupro countered by pushing into Rameka’s Super Conqueror and easily got the kill, forcing Taney_Local and Kiwi_Nightmare to over-extend over the rails to trade evenly. However, with the great early bleed from the Comets, Rupro was able to successfully defend 1v3 and allow his team to eliminate the remaining opponents.
Comets opted for a similar defence, instead utilising a double Batchat 25t on the hill to punish any aggressive plays. Archers secured the 1-2 line early with a T-100, Kranvagn and Vz 55, and started to apply cap pressure as soon as the flank was cleared. Comets realising the tactic, committed their double Batchat over the hill onto the isolated Kiwi_Nightmare and simultaneously applied pressure onto Chegar’s Super Conqueror. Identifying that Archers were sending a second tank to capture the base, Flaming proceeded to move to get resets. Despite losing a lot of HP, the Comets stalled long enough for the rest of their team to move into position and squash the remaining Archers, bringing their lead to 2-0.
Moving to Sand River, this was the last chance for Archers to get some points on the board and on the defending side this was the best map for it. Taney_Local attempted the hill climb at C7 but after a few slips didn’t make it up in time to avoid a salvo of fire from the Comets. Lacking a tank at A8 to punish, Darkknight was able to poke the sand-dunes with his Kranvagn and get a full clip into Chegar’s Super Conqueror. The Comets then began to spot out the southern half of the map but Taney_Local and Rameka were able to double-team Pp_Power’s Batchat, trading out a STB-1 in the process. Meanwhile on the other side of the map, Darkknight’s hull down Kranvagn got smashed by Kiwi_Nightmare’s T110E3, however Zealblade missed the opportunity to get a kill as Comets collapsed onto Rameka’s isolated Batchat in the south. Things went from bad to worse as Chegar lost all his HP driving through the open to get the kill on Darkknight, which Zealblade eventually picked up. With the T110E3 being so slow, the Comets were quick to collapse on Zealblade with their superior numbers, claiming their third win for the night.
Looking to secure a flawless match, the Comets played very aggressively in the south with a CS-63, Batchat 25t and a M-V-Y. However, some hesitation by the comets allowed Archers to get 3 tanks onto the 2 cap uncontested, leaving the Comets on rotation after abandoning south. Taney_Local tried to run interference but over-extends, losing all his HP in the process. With a 5v3 fight on the capture now, the comets cleaned up the remaining Archers, while poor Zealblade attempted to catch up only to be swarmed himself. Comets decisively took out the 4-0 victory, leaving the Archers once again to rethink their strategies.
Click here to see the match results!
|
|
0 :4 |
|


Match Two: Bundaberg Badgers vs Canberra Centurions
Himmelsdorf began with the Centurions pushing hard down western side of the map to try and make cap pressure. The Badgers had their entire team prepared and managed to punish Scott_Hanaray and Soltarian’s E 100. Realising that a 1 cap play was impossible, Centurions rotated towards the 2 cap with their remaining forces and applied cap pressure to bait Badgers out. Anticipating the Badgers would re-push the 2 cap, Centurions gambled by pushing up their E100s. Badgers were prepared and promptly rotated all their forces to kill the isolated E 100s before reinforcements arrived. Using their numbers advantage, the Badgers outbrawled the Centurions, claiming the first victory.
Badgers kept up the pressure by blobbing their team towards the 1 flag, however after crossing three of their tanks to the 1 line, the push was apparently halted by a single intimidating AMX 50B. After bleeding HP the Badgers realised they needed to push StiFe_Fil’s AMX 50B and made the correct call to rotate BadBoiBubbles onto the base to provide cross-fire. Now rotating Fury’s E100 onto the cap, Badgers had all the angles covered to provide heavy cap pressure and punished Toddy’s E100 as he attempted to reset. Toddy attempted to get a better angle on the F line but quickly realised he became a target as the Badgers pushed off the circle to eliminate both him and Soltarian. Collapsing onto the remaining opponents, the Badgers secured their second win on Himmelsdorf.
Moving to Cliff, the Badgers kept their blob tactics going on defence, this time pushing down the 1-2 line, along the E line and straight into Soltarian’s Obj 277. The Badgers then appeared not to have an idea of who to prioritise as their HP melted from crossfire. Having the high ground advantage, the Centurions methodically bled out Badgers’ mistake, finally getting a point on the scoreboard.
Swapping sides, both teams sent a CS-63 to the hill. Badgers were prepared for the crossing however and managed to shred half of Scott_Hanaray’s HP before he got to the top. As the fight turned into a Stalemate, the Centurions managed to trade better. When the push finally arrived, Spencer and Fury took most of the fire as BadBoiBubbles finally took out Scott_Hanaray on the hill. Despite being behind on HP the tank advantage and focus fire swung the game back in Badgers’ favour, methodically taking out the Centurions one by one, securing the overall victory for the Badgers.
Click here to see the match results!
|
|
3 :1 |
|

Match Two: Wollongong Wolverines vs Hawthorn Hellcats
Starting out on Ghost Town, the Wolverines set up a solid defence, covering all the angles and utilising the Batchat to scout out the south of the map. Hellcats meanwhile pushed the majority of their forces one by one onto the 2 flag, bleeding a lot of HP in the process. Realising that a capture wasn’t possible the Hellcats pushed off and focused down Mendicant_Bias’ E100. With the HP advantage, Wolverines were able to reply with focus fire onto G4tekeep3r and Gregori, shutting down Hellcats’ advances in the north of the cap and securing the first win of the match.
Wolverines opted for a much safer advance onto the base with two E100s and an IS-4, utilising The_Forsaken_Army in the Batchat on the western side for fire support and to distract the IS-7 defending there. As Gregori made advances to defend the base, Barricade’s T57 sprung out from behind cover, delivering a punishing full clip of damage which resulted in Gregori being knocked out. Meanwhile, Hellcats used their 2v1 advantage to pressure out the annoying Batchat, which forced Wolverines to keep pressuring the city before Hellcats were able to rotate more guns into the main brawl. With Hellcats running out of HP and tanks, DarthCavalier made a last-ditch attempt to take out the low HP Wolverines, but it wasn’t enough, and the Wolverines secured a 2-0 on Ghost Town.
Moving to Tundra with Wolverines on the Defence, the leaders opted for a very heavy lineup, committing a double Vz 55 into A1 for ambushing purposes. Hellcats utilised a slow and methodical advance onto the 1 cap but were completely caught off guard when two Vz 55s counter-pushed the A line, with DarthCavalier taking over 2000 damage in a salvo! Hellcats desperately looked to get damage but were unsuccessful in getting a kill and ultimately fell prey to the double Vz clip as soon as they reloaded once again.
Wolverines were now on the prowl for a 4-0 and opened their attack with an IS-7 pushing straight to A3 uncontested. Despite bleeding a lot of HP, the Hellcats launched a counter-offensive onto the IS-7 with a M-V-Y and a Kranvagn. Mendicant_Bias did a great job stalling out the 1v2 engagement until Barricade arrived with the flanking manoeuvre, shutting down Hellcats’ northern play in one fell swoop. Wolverines proceeded to group their heavies and confidently won the 4v2 engagement, cementing their unchallenged victory in this series with a 5-0 result in the final game.
Click here to see the match results!
|
|
4 :0 |
|


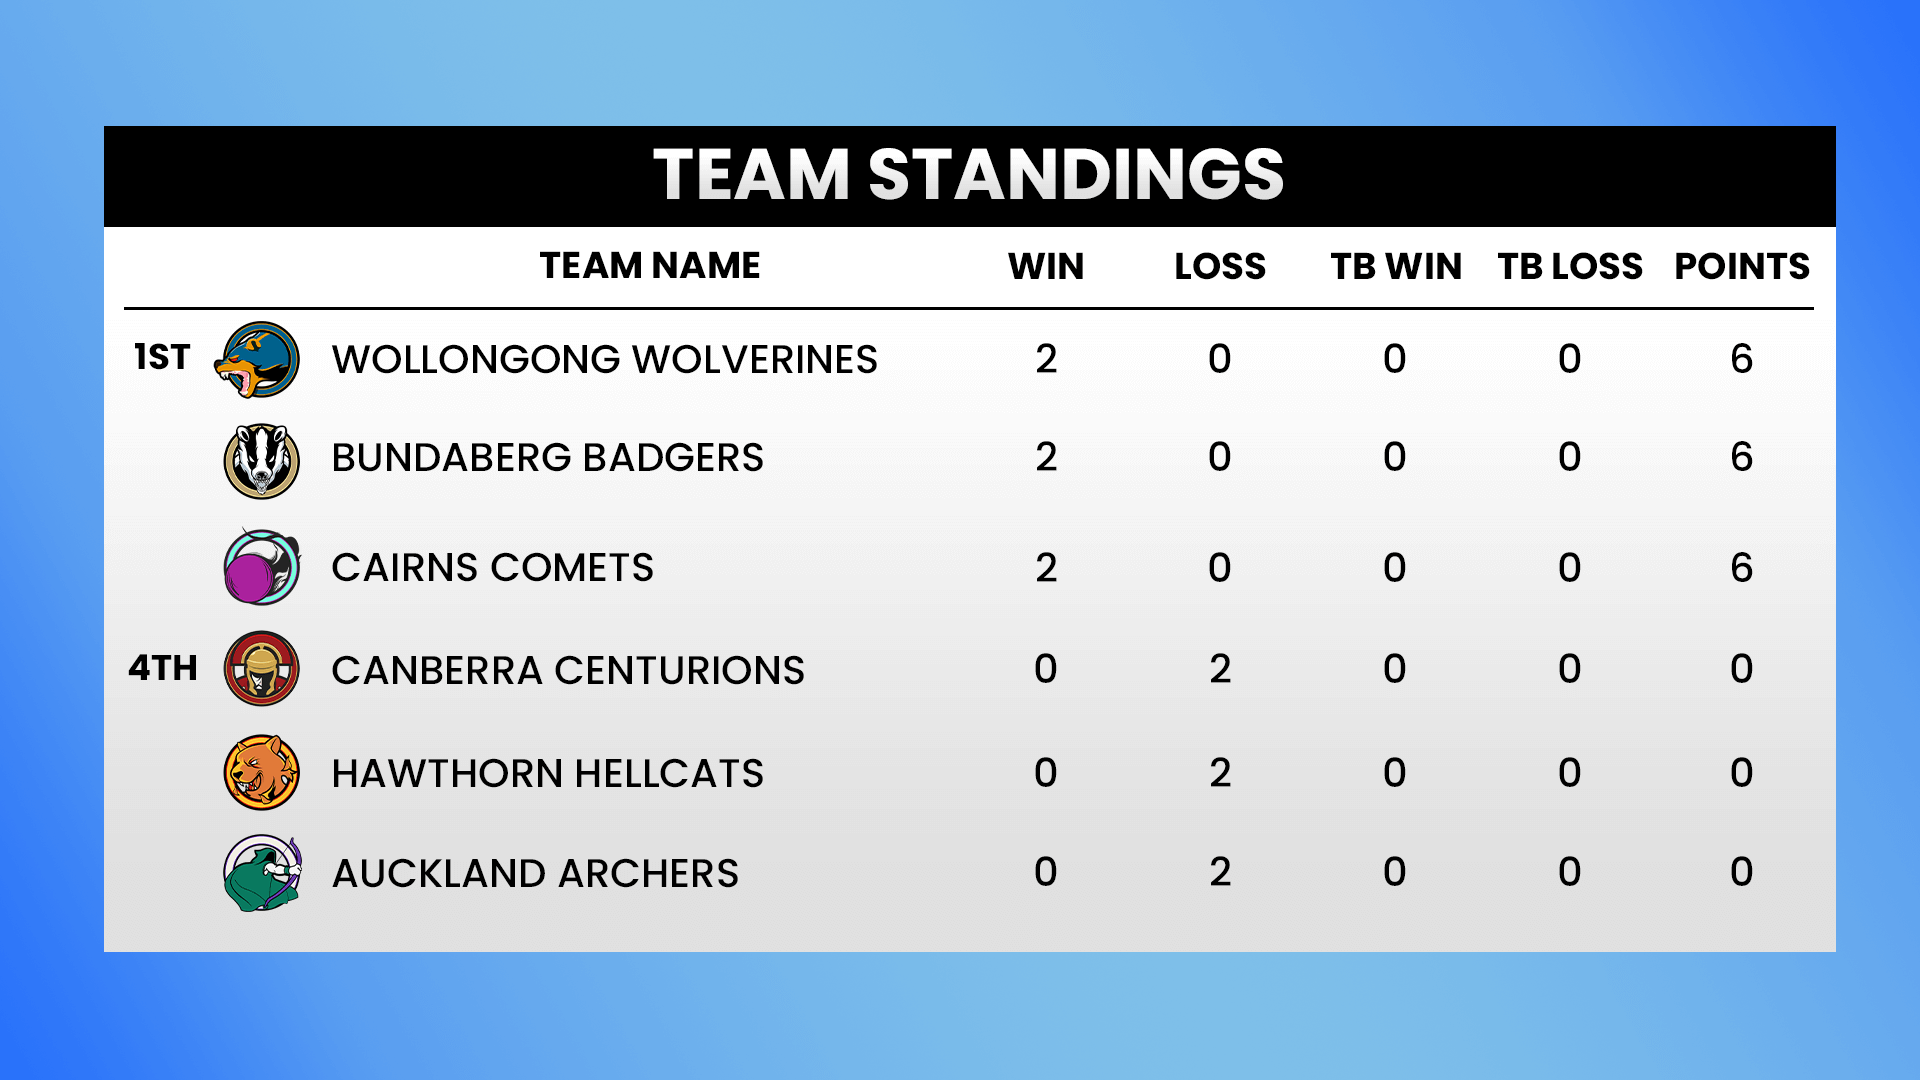
Leaderboard
If you've missed all of Week 2's action, you can check out the entire VOD here in it's glory (no Drops though):
Overall, we saw the same teams securing victories again this week. With the leaderboard starting to show who’s the top teams to beat are, there’s always a chance for teams to pick up their game and get some victories on the board in the upcoming weeks.
Roll out!