Strategy Breakdown - The Prokhorovka 1-2 Push

One of the most well-known open maps in World of Tanks, the sprawling fields of Prokhorovka see a lot of action, with multiple different styles being employed by teams. The most common styles you'll see are:
- Hill control - utilizing fast mediums and heavies to grab control of the hillside as well as the middle section closest to the railway yard. The goal is to surprise any opponent that may be split, followed by an attack with control across one side of the map.
- 1-2 line control - the traditional approach of using camouflage and cover. This mainly involves pushing your forces into the back pockets of the 1-2 line, followed by aggression from hull-down tanks at mid to help support this endeavor.
- Medium brawl - although not as often used, the middle brawl sees teams bringing fast mediums and heavies into play, and forcing a direct encounter with isolated tanks. They will continuously use their momentum and speed to clear out enemy vehicles. This can be a big risk when not playing in Fog of War, but works well against teams that play slow and deploy their Chieftains into the middle at the beginning without any tanks to support them.
There's obviously more strategies that a team can deploy on this map, but these are the predominant ones you'll see. Today, we'll go over the basic 1-2 line play, where to set up tanks, and the key points of the strategy!
Note: If possible, you want to bring Chieftains over Super Conquerors if available, as they can get into positions a bit more quickly. However, if you've got a Turbocharger on your Super Conquerors and they're the only tanks you have, it's perfectly fine to bring them! They'll be able to play around their positions appropriately.
Similarly, I have chosen Object 907s for their reliability over the Object 140s, but for clans with fewer reward vehicles, you can take 140s instead and supplement with 277s for extra HP in brawls.
Opening Moves
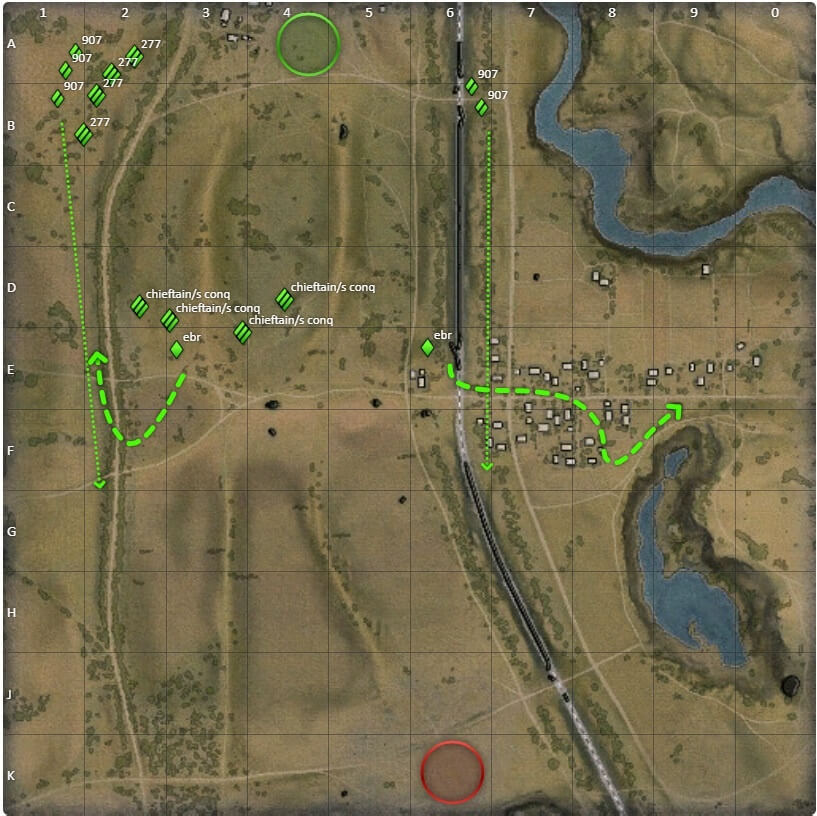
Your opening position involves getting your hull-down heavies on the 3-4 lines on the ridges, ready to play towards the 1-2 side of the map. Your 277s are positioned as the spearhead on the 1-2 line, but depending on the information you have, you can set them up to receive with your mediums, or start preparing them for your push once you're confident about where their forces are.
The two mediums on the line are designed to hit EBRs that are crossing the rails—these early shots are very helpful for your EBR drivers, as well as making it easier for your EBR to win EBR fights, and then, as a result, go on to play the late game.
Once the early skirmish has ended, the EBRs confirm the vision they have and fall back together to the 1-2 line. Your mediums that had early shots drop back to the 1-2 line and get hull-down at the hill around A2. Meanwhile, the initial strike force pushes, with your heavies at the middle starting to rotate and getting ready to take the bowls within E2 and F2, depending on the scenario.
Taking Control
The key with this strike force is the ability to dig out the strong position at K1, with your EBRs leading and getting vision control for your heavies at the middle, who can then farm. You will take damage, but you need to go past and destroy any potential enemy tanks in this quadrant.
Once that has been dealt with, you can see why this position will be strong. Remember to push underneath the ridge at the 1-line - the lower down you are, the lower your tank silhouette, and the better your chances of avoiding enemy fire from the middle position!

Although you may lose a few forces as indicated here, once you're set up, you have amazing control over the entire left side of the map - allowing you to rotate to respond to the enemy counter-push, to get effective crossfire out, and to establish a winning position to take the enemy capture point while protecting your own.
The key in this strategy is commitment and understanding priority threats, and this only comes with practice and time!
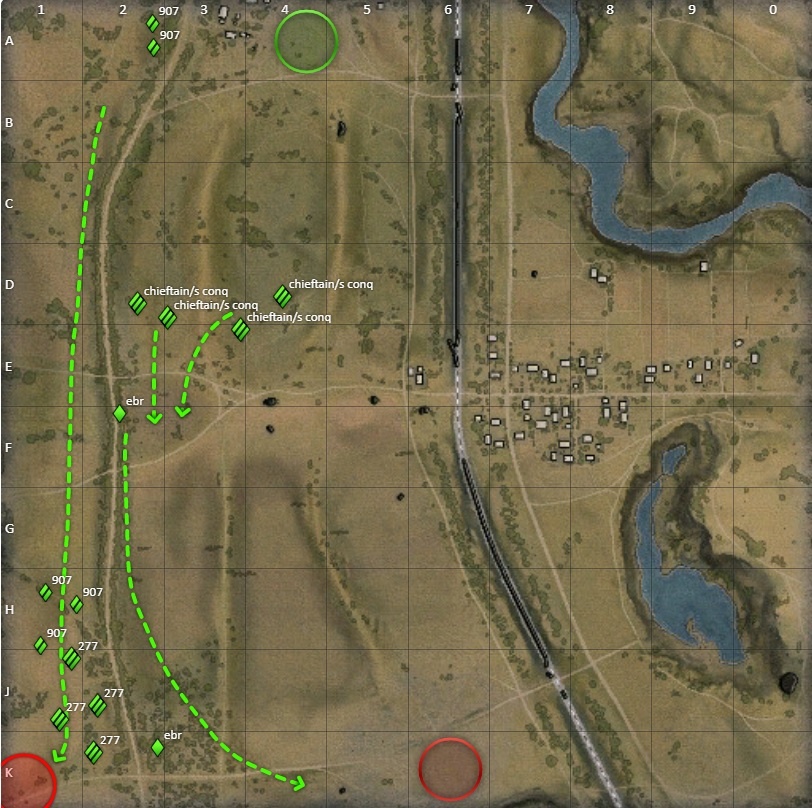
You can also play this strategy from the south spawn—in this case, the critical area for taking is the A2 hulldown position. If you cannot win this position in a brawl, it becomes very difficult to earn a victory afterwards.
Special Guest: Mr. Manley from Wargaming APAC!
You may have come across Will if you've played in tournaments before! He's the friendly neighbourhood WeeGee who keeps the tournaments ticking and prizes exciting.
However, this was his first time experiencing experiencing the joys of campaigns! Here's what he had to say.
Will: Hey all! My name is Will, I’ve played my very first Campaign ever with L1ME, and it has been a great experience.

Going into it, I had no reward tanks and only a few Tier Xs. It has been tough to get games with the callers mostly picking meta reward tanks like the Chieftain or 279e, and the few slots open for a CS-63 are usually taken by those more proven than myself. But as the event progressed, I’ve made more of a name for myself as a solid CS player who listens to callers, and have thus been getting more and more games.
I have learnt where I can penetrate a 279e (a tank I never even encountered prior to this campaign), and to instinctively block for low HP teammates, as well as to focus on targeting low HP enemies. I’ve learnt to move behind tanks, predict fire EBRs, and some common spots to position.
Overall, the event was really fun, and was definitely an enjoyable start to the Clan Wars scene. I’m really looking forward to my next campaign!
Situational Tank #3 - Object 268 v4
| Recommended Equipment | Rationale |
|---|---|
|
|
|

Once a tank that people feared to meet on the battlefield, it's been more consigned to the back door of late. With hull-down tanks now driving the meta, the
 X
X
![]() Object 268 Version 4
just has too many problems: the turretless platform, long aim time, and the fact that you don't have a turret (seriously, can you tell I don't like tanks without turrets?).
Object 268 Version 4
just has too many problems: the turretless platform, long aim time, and the fact that you don't have a turret (seriously, can you tell I don't like tanks without turrets?).
However, you'll still see it being used occasionally when teams want to assault a position: they'll lead with a few v4s in front, then have fast heavies like the Object 277 back it up. When trying to take a position that isn't under heavy crossfire, this tank can survive for a long period of time, bouncing shots, securing vital positioning, and taking favorable fights before going on to win the game.
This tank still packs an absolute punch with 650 alpha, and its survivability isn't significantly compromised by its three small weakpoints—its two cupolas, and "lower" lower frontal plate.
However, as with every tank, there are downsides to the Object 268 v4, namely:
- DPM and gun handling - this tank doesn't have a fantastic DPM or aim time. The gun won't treat you like a T110E3, nor deliver the same value, as it has lower penetration values across the board.
- Turretless - it's been mentioned a million times already, but the fact that your platform is required to move to make and/or block shots makes it very tricky to use in situations where you are getting flanked and overwhelmed.
- Upper frontal plate is only good at an angle - the Object 268 v4 primarily relies on angling to make its armor work, so it needs to fight opponents on flat ground. If they get above you, it's all over, as their shots can just penetrate your upper engine deck.
Weakspots aside, how do you nullify the shock and awe factor when you see three of these tanks bearing down on you?
The first thing to do is spread out and create subtle crossfires. Focus on tracking and stopping the movement of these tanks so they cannot overwhelm any positions, then whittle them down—their HP won't be able to outlast a heavy tank's.
If you do have to fight frontally, try creating flanking routes, while getting a shot at either the side of its tracks, or the cupola if you just need to do damage.