Tank Commanders!
This Season, Frontline will be available in 4 Stages rather than the previous Episode format, each lasting for a week. It will also share a progression system with Steel Hunter, known as the Expedition. Each Stage will reward you with up to 3 tokens, the Expedition event currency, instead of the Prestige Points of last Season. Use the tokens you've earned here and by playing Steel Hunter to redeem any two of three exclusive reward vehicles:
- The Object 777 Version II, a brand-new Soviet heavy tank
- The Char Futur 4, a unique new French medium tank
- The AE Phase I, an American heavy tank with four segmented tracks
All these vehicles feature a built-in Large Repair Kit as a handy bonus. Please note that if you already have the AE Phase I on your account, you will not be able to redeem a second one for tokens.

Also, instead of 30 Frontline Tiers, there will only be 15 Tiers per Stage. Completing them will require almost half as much Frontline Experience as the last Season. Upon reaching the final Tier, you will receive all 3 tokens for that Stage, regardless of how well you have performed in battle, as well as special daily missions, which will grant you even more rewards.
It won’t be possible to replay any missed Frontline Stages, so skipping one may mean losing the opportunity to earn its tokens. After the completion of each Stage, progress is reset and you’ll begin the next Stage the following month from Tier 1.
Check out the mission conditions and further information in the official Frontline 2020 announcement!
Rewards

As usual, good performance in Frontline will bring you heaps of rewards: credits, directives, and Personal Reserves, as well as bonds. They include the following:
- Rewards for each Frontline Tier – for those who want to play casually.
- Rewards for completing daily missions – for those who have completed all 15 Tiers and want more!
- And finally, exclusive Tier IX Tanks – a worthy reward for perseverance and progress through the Expedition!
Be sure to join the event so you don't miss out!
Frontline 2020 Schedule
|
Start |
End |
|
|---|---|---|
| Stage 1 | 9 March 2020 07:00 UTC +8 |
16 March 2020 04:00 UTC +8 |
| Stage 2 | 6 April 2020 07:00 UTC +8 |
13 April 2020 04:00 UTC +8 |
| Stage 3 | 27 April 2020 07:00 UTC +8 |
4 May 2020 04:00 UTC +8 |
| Stage 4 | 25 May 2020 07:00 UTC +8 |
1 June 2020 04:00 UTC +8 |
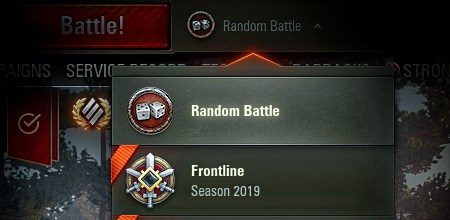
Select the corresponding tab in the battle type drop-down list to enter the Frontline queue.
- Normandy
- Kraftwerk


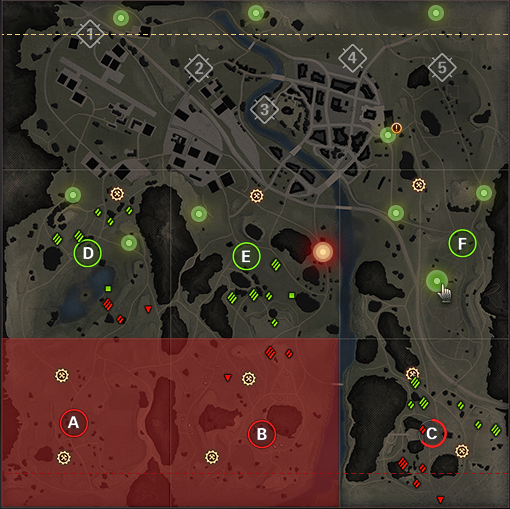
The map has 5 pillboxes. As soon as attackers capture at least one sector within the 2nd defensive front they can embark on their primary mission and destroy Pillboxes: long-range guns, each with their own HP pool. Pillboxes are protected by armored hoods and virtually impenetrable from head-on. Aim at their rear, where there is significantly thinner armor. The attacking team win as soon as they destroy 3 pillboxes.
 Active
 Destroyed
 Active
 Destroyed

There are special spots scattered across the active combat area where you can restore HP, repair modules, replenish ammo and consumables.
Repair and Resupply Zones have a cooldown time. Once you have repaired your vehicle to 100%, you must wait 120 seconds before you can use it again. If you are hit while in a Repair or Resupply zone, you must wait an additional 5 minutes to stock up on rounds and finish repairing the vehicle.


An area on the map where the attacking team can gain control over a particular front. Standard base capture mechanics apply: once the attacking vehicles enter the circle, the front begins being captured. When the attackers capture a base, they take control of the entire zone, and the next zone (vertically) becomes available for capture.
 Captured zone
 Uncaptured zone

An area on the map where the attacking team can gain control over a particular front. Standard base capture mechanics apply: once the attacking vehicles enter the circle, the front begins being captured. When the attackers capture a base, they take control of the entire zone, and the next zone (vertically) becomes available for capture.
Captured zone Uncaptured zone
The map has 5 pillboxes. As soon as attackers capture at least one sector within the 2nd defensive front they can embark on their primary mission and destroy Pillboxes: long-range guns, each with their own HP pool. Pillboxes are protected by armored hoods and virtually impenetrable from head-on. Aim at their rear, where there is significantly thinner armor. The attacking team win as soon as they destroy 3 pillboxes.
Active Destroyed Active Destroyed
The map has 5 pillboxes. As soon as attackers capture at least one sector within the 2nd defensive front they can embark on their primary mission and destroy Pillboxes: long-range guns, each with their own HP pool. Pillboxes are protected by armored hoods and virtually impenetrable from head-on. Aim at their rear, where there is significantly thinner armor. The attacking team win as soon as they destroy 3 pillboxes.
Active Destroyed Active Destroyed There are special spots scattered across the active combat area where you can restore HP, repair modules, replenish ammo and consumables.
Repair and Resupply Zones have a cooldown time. Once you have repaired your vehicle to 100%, you must wait 120 seconds before you can use it again. If you are hit while in a Repair or Resupply zone, you must wait an additional 5 minutes to stock up on rounds and finish repairing the vehicle.
There are special spots scattered across the active combat area where you can restore HP, repair modules, replenish ammo and consumables.
Repair and Resupply Zones have a cooldown time. Once you have repaired your vehicle to 100%, you must wait 120 seconds before you can use it again. If you are hit while in a Repair or Resupply zone, you must wait an additional 5 minutes to stock up on rounds and finish repairing the vehicle.


An area on the map where the attacking team can gain control over a particular front. Standard base capture mechanics apply: once the attacking vehicles enter the circle, the front begins being captured. When the attackers capture a base, they take control of the entire zone, and the next zone (vertically) becomes available for capture.
Captured zone Uncaptured zone There are special spots scattered across the active combat area where you can restore HP, repair modules, replenish ammo and consumables.
Repair and Resupply Zones have a cooldown time. Once you have repaired your vehicle to 100%, you must wait 120 seconds before you can use it again. If you are hit while in a Repair or Resupply zone, you must wait an additional 5 minutes to stock up on rounds and finish repairing the vehicle.
There are special spots scattered across the active combat area where you can restore HP, repair modules, replenish ammo and consumables.
Repair and Resupply Zones have a cooldown time. Once you have repaired your vehicle to 100%, you must wait 120 seconds before you can use it again. If you are hit while in a Repair or Resupply zone, you must wait an additional 5 minutes to stock up on rounds and finish repairing the vehicle.


An area on the map where the attacking team can gain control over a particular front. Standard base capture mechanics apply: once the attacking vehicles enter the circle, the front begins being captured. When the attackers capture a base, they take control of the entire zone, and the next zone (vertically) becomes available for capture.
Captured zone Uncaptured zone There are special spots scattered across the active combat area where you can restore HP, repair modules, replenish ammo and consumables.
Repair and Resupply Zones have a cooldown time. Once you have repaired your vehicle to 100%, you must wait 120 seconds before you can use it again. If you are hit while in a Repair or Resupply zone, you must wait an additional 5 minutes to stock up on rounds and finish repairing the vehicle.


An area on the map where the attacking team can gain control over a particular front. Standard base capture mechanics apply: once the attacking vehicles enter the circle, the front begins being captured. When the attackers capture a base, they take control of the entire zone, and the next zone (vertically) becomes available for capture.
Captured zone Uncaptured zone

The map has 5 pillboxes. As soon as attackers capture at least one sector within the 2nd defensive front they can embark on their primary mission and destroy Pillboxes: long-range guns, each with their own HP pool. Pillboxes are protected by armored hoods and virtually impenetrable from head-on. Aim at their rear, where there is significantly thinner armor. The attacking team win as soon as they destroy 3 pillboxes.
Active Destroyed Active Destroyed 
An area on the map where the attacking team can gain control over a particular front. Standard base capture mechanics apply: once the attacking vehicles enter the circle, the front begins being captured. When the attackers capture a base, they take control of the entire zone, and the next zone (vertically) becomes available for capture.
Captured zone Uncaptured zone 
There are special spots scattered across the active combat area where you can restore HP, repair modules, replenish ammo and consumables.
Repair and Resupply Zones have a cooldown time. Once you have repaired your vehicle to 100%, you must wait 120 seconds before you can use it again. If you are hit while in a Repair or Resupply zone, you must wait an additional 5 minutes to stock up on rounds and finish repairing the vehicle.
An area on the map where the attacking team can gain control over a particular front. Standard base capture mechanics apply: once the attacking vehicles enter the circle, the front begins being captured. When the attackers capture a base, they take control of the entire zone, and the next zone (vertically) becomes available for capture.
Captured zone Uncaptured zone There are special spots scattered across the active combat area where you can restore HP, repair modules, replenish ammo and consumables.
Repair and Resupply Zones have a cooldown time. Once you have repaired your vehicle to 100%, you must wait 120 seconds before you can use it again. If you are hit while in a Repair or Resupply zone, you must wait an additional 5 minutes to stock up on rounds and finish repairing the vehicle.
There are special spots scattered across the active combat area where you can restore HP, repair modules, replenish ammo and consumables.
Repair and Resupply Zones have a cooldown time. Once you have repaired your vehicle to 100%, you must wait 120 seconds before you can use it again. If you are hit while in a Repair or Resupply zone, you must wait an additional 5 minutes to stock up on rounds and finish repairing the vehicle.
The map has 5 pillboxes. As soon as attackers capture at least one sector within the 2nd defensive front they can embark on their primary mission and destroy Pillboxes: long-range guns, each with their own HP pool. Pillboxes are protected by armored hoods and virtually impenetrable from head-on. Aim at their rear, where there is significantly thinner armor. The attacking team win as soon as they destroy 3 pillboxes.
Active Destroyed Active Destroyed The map has 5 pillboxes. As soon as attackers capture at least one sector within the 2nd defensive front they can embark on their primary mission and destroy Pillboxes: long-range guns, each with their own HP pool. Pillboxes are protected by armored hoods and virtually impenetrable from head-on. Aim at their rear, where there is significantly thinner armor. The attacking team win as soon as they destroy 3 pillboxes.
Active Destroyed Active Destroyed The map has 5 pillboxes. As soon as attackers capture at least one sector within the 2nd defensive front they can embark on their primary mission and destroy Pillboxes: long-range guns, each with their own HP pool. Pillboxes are protected by armored hoods and virtually impenetrable from head-on. Aim at their rear, where there is significantly thinner armor. The attacking team win as soon as they destroy 3 pillboxes.
Active Destroyed Active Destroyed The map has 5 pillboxes. As soon as attackers capture at least one sector within the 2nd defensive front they can embark on their primary mission and destroy Pillboxes: long-range guns, each with their own HP pool. Pillboxes are protected by armored hoods and virtually impenetrable from head-on. Aim at their rear, where there is significantly thinner armor. The attacking team win as soon as they destroy 3 pillboxes.
Active Destroyed Active Destroyed There are special spots scattered across the active combat area where you can restore HP, repair modules, replenish ammo and consumables.
Repair and Resupply Zones have a cooldown time. Once you have repaired your vehicle to 100%, you must wait 120 seconds before you can use it again. If you are hit while in a Repair or Resupply zone, you must wait an additional 5 minutes to stock up on rounds and finish repairing the vehicle.
There are special spots scattered across the active combat area where you can restore HP, repair modules, replenish ammo and consumables.
Repair and Resupply Zones have a cooldown time. Once you have repaired your vehicle to 100%, you must wait 120 seconds before you can use it again. If you are hit while in a Repair or Resupply zone, you must wait an additional 5 minutes to stock up on rounds and finish repairing the vehicle.
There are special spots scattered across the active combat area where you can restore HP, repair modules, replenish ammo and consumables.
Repair and Resupply Zones have a cooldown time. Once you have repaired your vehicle to 100%, you must wait 120 seconds before you can use it again. If you are hit while in a Repair or Resupply zone, you must wait an additional 5 minutes to stock up on rounds and finish repairing the vehicle.
An area on the map where the attacking team can gain control over a particular front. Standard base capture mechanics apply: once the attacking vehicles enter the circle, the front begins being captured. When the attackers capture a base, they take control of the entire zone, and the next zone (vertically) becomes available for capture.
Captured zone Uncaptured zone An area on the map where the attacking team can gain control over a particular front. Standard base capture mechanics apply: once the attacking vehicles enter the circle, the front begins being captured. When the attackers capture a base, they take control of the entire zone, and the next zone (vertically) becomes available for capture.
Captured zone Uncaptured zone There are special spots scattered across the active combat area where you can restore HP, repair modules, replenish ammo and consumables.
Repair and Resupply Zones have a cooldown time. Once you have repaired your vehicle to 100%, you must wait 120 seconds before you can use it again. If you are hit while in a Repair or Resupply zone, you must wait an additional 5 minutes to stock up on rounds and finish repairing the vehicle.
There are special spots scattered across the active combat area where you can restore HP, repair modules, replenish ammo and consumables.
Repair and Resupply Zones have a cooldown time. Once you have repaired your vehicle to 100%, you must wait 120 seconds before you can use it again. If you are hit while in a Repair or Resupply zone, you must wait an additional 5 minutes to stock up on rounds and finish repairing the vehicle.
Other Game Mechanics
Respawns, Resupply Points, and Combat Reserves (that can help win even in a desperate situation) will be available in Frontline mode.
Respawns
- At the beginning of each battle, each player will have one respawn.
- Every 5 minutes, one more respawn will be added, but you cannot accumulate more than 2.
- The total number of respawns is unlimited.
- Players will not be able to respawn in zones where 12 or more allies are already fighting.
- There can only be 1 SPG per zone; if there is already one in the current zone, you will not be able to respawn in an SPG.
- In the previous Season, you could only choose the direction in which to respawn, and the specific point of your entry into the game was determined automatically. This time, players on the attacking team will have up to 4 dynamic respawn points to choose from, and the defending team up to 6, including those behind the front lines. The defending team has more respawn points because they must be able to fall back and repel the enemy’s attack if it breaks through to the pillboxes.
- If the player's vehicle is destroyed and there are respawns available, the player will be transferred to the respawn screen, where they can select an appropriate vehicle and a respawn point within the zones controlled by the player's team. Respawn points that are under attack are highlighted in red and are not available.
- Changing lanes in battle: This feature was introduced due to the large map size. It can be useful when you have destroyed the enemy on a flank and captured the last zone, and need to move to another flank quickly to support your allies. Pressing J will display the vehicle selection panel, and allow you to choose another vehicle and respawn in another flank. This will cause your current vehicle to self-destruct after a short countdown; smart deployment of this feature may lead to victory in certain situations.

Combat Reserves
There are 6 types of Combat Reserves available for use in Frontline mode. You may select them in the Garage, but only before entering battle. The Combat Reserve slots are displayed to the left of the standard consumables.
Each vehicle type has a certain number of slots for Combat Reserves:
- Three slots for heavy tanks
- Two slots for tank destroyers and medium tanks
- One slot for light tanks and SPGs
This distribution will help each vehicle type influence the battle in different ways.
Each Combat Reserve has 5 levels, and can be upgraded using the Combat Reserve Points received for earning Frontline Tiers. You will need to manually unlock and upgrade your Combat Reserves once you have sufficient Points.
How Combat Reserves WorkEffectiveness values specified below are for Reserves at maximum level (5) |
|
|---|---|
|
|
|
|
|
|
Resupply Points
In addition to a base, every zone has a Resupply Point where players can replenish shells and restore vehicle durability, damaged vehicle modules, and injured crew members.
- If a player's vehicle receives damage during repair, the process is paused for 5 minutes.
- Once a vehicle is fully repaired, the Resupply Point becomes unavailable for 3 minutes.
At the end of the battle, players will be charged the full cost of the restored vehicle durability, but no more than 100% of the vehicle’s durability.
Examples:
- A player repairs a vehicle three times, for 20% of full vehicle durability each; they will pay for repairing 60% of the vehicle's durability.
- a player repairs a vehicle three times, for 40% of full vehicle durability each: they will pay for repairing 100% of the vehicle's durability, instead of 120%. This applies even if the vehicle has been destroyed in the meantime.
- Thus, any repairs over the vehicle's full durability are free of charge.
The total cost of replenished shells will also be charged.
- In this case, if the number of spent shells exceeds the ammo rack's capacity, the ammo cost will be deducted from the credits earned in battle.
Consumables work in a similar way to Random Battles: they will be deducted if used at least once, irrespective of the total number of uses.
Awards for Effectiveness in Battle
Players can receive some special awards for effectiveness in battle:
|
Occupying Force |
Iron Shield |
General of the Army |
Supreme Gun |
Small Army |
|
|
|
|
|
|
|
As an attacker, earn a total of 100 base capture points or destroy an enemy's main objective. |
As a defender, cause 1,800 HP of damage to vehicles in zone bases or within 150 metres of the main objectives. |
Be the top player with the highest base XP at the end of the battle from both teams and also receive General rank. |
Awarded to players who caused and assisted in dealing the highest amount of damage during a battle (at least 10,000 HP). |
Awarded to a platoon that destroyed at least 20 enemy vehicles in one battle. Each platoon participant receives this title. |

Frontline Progression System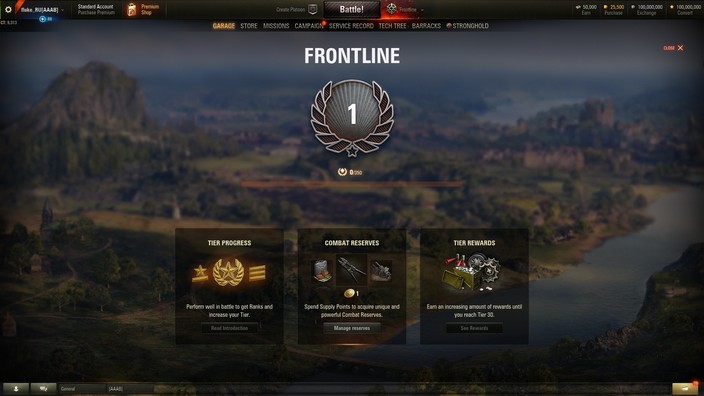

Improving Your Rank
In Frontline, there are six Ranks, ranging from Private to General. You may improve your Rank by earning experience in battle through the effectiveness of your combat actions. The more total experience you earn from all tanks that participated in battle, the higher the Rank you will receive.
Ranks are updated live during the battle, so you can easily track your progress!
Depending on your Rank, you will receive an experience multiplier, which will be applied after the battle to the total net experience of all tanks used in battle.
|
Rank |
Private
|
Sergeant
|
Lieutenant
|
Captain
|
Major
|
General
|
|
Frontline EXP |
- |
+150 |
+350 |
+600 |
+900 |
+1,200 |
Frontline Tiers
As mentioned above, depending on the Rank you achieve in each battle, you will earn Frontline Experience, which is used to increase your Frontline Tier and progress through Season 2020.
All in all, there are 15 Tiers, and reaching each Tier will entitle you to special rewards.
Frontline Experience Required |
||||
|---|---|---|---|---|
| Tier 1 | Tier 2 | Tier 3 | Tier 4 | Tier 5 |
| 0 | 400 | 500 | 600 | 700 |
| Tier 6 | Tier 7 | Tier 8 | Tier 9 | Tier 10 |
| 800 | 1000 | 1100 | 1200 | 1300 |
| Tier 11 | Tier 12 | Tier 13 | Tier 14 | Tier 15 |
| 1400 | 1500 | 1600 | 1700 | 2000 |