ANZPL Summary
This week saw thrills, spills, and surprises all around! Without further delay, let’s dive into the mayhem that was ANZPL Season Four, Week Seven!
Christchurch Conquerors vs Brisbane Bulldogs
Starting out on the Conqueror’s map pick of Sand River, both teams were under pressure to recover from the previous weeks and get their rhythm back again. It certainly looked promising for the Conquerors, as they managed to bleed a significant amount onto Ravvi’s Kranvagn early, which ultimately resulted in his tank being destroyed when he tried to rotate away. Trying to salvage the game, the Bulldogs tried an attack on the A line, but it was all in vain as the Conquerors were entirely prepared and had set up a crossfire, securing the first match.
Swapping sides, the Conquerors looked to try and take control of the south in a controlled manner. However, with the clock ticking and not much progress made, the Conquerors blitzed two Bat-Chat down the 0 line to eliminate MadHouse’s VZ. 55. With a crossfire established, it wasn’t long before Ravvi and Cows were also taken out, and the Conquerors began to apply cap pressure. In a move of overconfidence, the Conquerors over-extended to try and take out AVP’s S. Conqueror but a few unsuccessful shots meant he survived leaving them on less than a minute to capture the two flag. Securing an incredible reset shot at zero seconds on the timer levelled the score for the Bulldogs to 1-1.
The third match saw an introduction to a map not played all season – Murovanka! Bulldogs opted for a two cap attack with a T-100 applying pressure and the rest of the team spread out to provide cover. Identifying that Soldat was alone in A6, the Conquerors charged two Bat-Chat 25ts and got an easy 5v4 advantage. The Bulldogs tried to salvage the game by re-pushing the south but with a lot of open ground to cross and a hitpoint disadvantage, it didn’t go so well as the Conquerors held strong for a defending side victory.
To get a quick victory, the Conquerors made an aggressive charge down the 1-2 line and applied triple cap pressure while Bluey took the buildings on the 1 line. This turned disastrous as Madhouse shredded his tank down to very little HP. The Bulldogs held strong getting reliable resets and punishing Whippet’s over-extension on the 3 line. With the Conquerors caught in a crossfire, bulldogs managed to hold on and move to tiebreaker.
Both teams started to feel Déjà vu going into the tiebreaker, and Bulldogs were determined not to let history repeat itself. With a versatile line-up the Bulldogs were quick to identify that there were no tanks in the middle of Prokhorovka and likely none on the 1-2 line. With the T-100 on the one flag, Bulldogs threw down the gauntlet and challenged Conquerors to rotate a tank to reset. After being reset once, Madhouse found a cheeky position to block line of sight and forced KritaKil to overextend to get reset shots. Bulldogs got some great supporting fire and managed to keep Madhouse alive, eliminating KritaKil in the process. Meanwhile Bluey got caught out rotating through K2 and left the Conquerors in a precarious position to deal with the imminent base pressure. The Bulldogs pushed hard as the Conquerors looked for resets, resulting in the history-making tiebreaker win they wanted desperately.
Perth Panthers vs South Sydney Skorpions
Both teams this week picked maps they were previously undefeated on. Starting out on Tundra the Skorpions knew to expect a solid defence from the Panthers, and they were not disappointed. After playing for information, the rotation to the south’s two flag forced the Panthers to rotate a Kranvagn on the 1 line to get resets. Grouping with a Bat-Chat, the re-push eventually wiped out the Skorpions’ capture attempt. Trying to salvage the game the Skorpions pushed through the north but with a tank and HP disadvantage, it was futile in the end.
On the defence, the Skorpions brought an unusual tank pick – an AMX 13 105! In a ploy to take out the light tank, Panthers set up a trap with a VZ. 55 in K9 but JT managed to sniff it out and got away without taking any damage. The Panthers grouped up and committed three tanks through the riverbed undetected, obliterating Night in crossfire. With a push from the north and riverbed now overwhelming the defending forces, the Panthers cleaned up a 2-0 lead on Tundra and remained undefeated.
Moving to Mines, the Skorpions needed a win to stay in the series and their map pick was no better opportunity. Unfortunately on attack they struggled to find an attacking angle and ended up having to commit both JT and Auzzi on the 9 line to start pressuring the one flag, with JT running interference. The Panthers fought back by retaking the hill with two S. Conquerors, forcing Russian to retreat. As the Panthers dealt with a now isolated JT, Skorpions took dominant positions in the middle and set up crossfire. A well-timed flank by Russian saw the Obj. 277 pair getting shut down with assistance from Napalmer, however with 40 seconds remaining and barely any HP left on their tanks, the Skorpions grouped up for one final assault onto Godmode on the hill. With the Skorpions falling one by one to get damage out, Napalmer got the impossible kill at 0s on the clock, securing their first victory for the night.
Setting up with a passive crossfire, the Skorpions covered all attack angles on their defence and utilised an unusual IS-4 position at H4 to get information. The Panthers tried a similar commit on the 9 line but the Skorpions were entirely prepared with Night being in a position to get heavy bleed onto Twit’s Obj 277. Despite getting good bleed, the Panthers needed a decisive push if they wanted to win and a collapse on the 4 line came at a cost of a lot of HP. Meanwhile, a repush on the 9 line put the Panthers into a crossfire and utilising the HP advantage, the Skorpions held strong to level the score to 2-2.
With a tiebreaker meaning that Sandman would have to be nice to Elfishguy, both teams now looked to secure the victory on Prokhorovka. With a faster attacking win, the Panthers opted for the defence side and both teams charged for a brawl in the middle of the map. The Skorpions utilised an IS-7 on the 7 line to help with the CS-63 brawl. Realising he was outnumbered, JS retreated north and called for a dump over the middle ridge. The crossfire and focus fire were too intense for the Panthers as they bled a lot of HP making this push and Skorpions pulled out the broomsticks for a convincing reverse sweep.
North Sydney Sentinels vs Adelaide Action X
Kicking off on Himmelsdorf, the Sentinels aimed to continue their defence streak and made an aggressive rotation to the 8 line, keeping two E-100s hidden in ambush. With Action X getting spotted on the hill and crossing two AMX 50Bs on the K line, the Sentinels closed the pocket, leaving Action X caught on rotation. By the time Saxon arrived to the fight, Action X had already lost an AMX 50B and an IS-4, and the Sentinels kept the momentum going, pushing into low HP targets and securing first win for the night.
Swapping sides, Action X took aggressive positions in the courtyard, only to be punished by TheReturned’s Bat-Chat on the hill. Poor Val got ignited and the HP swung in the favour of the Sentinels very early on. Action X managed to catch Rainbow isolated but ended up losing Saxon as the repush arrived. Despite this, the Sentinels were now boxed in and forced to bleed no matter where they wanted to push. With a simultaneous push on the 1 and 3 lines, the Sentinels put the pressure on the 1 cap before pushing off to take out CJ. CJ managed to escape and ran away to play for time, leaving Dongerlord to reset the base. As the reset shots came out, Action X narrowly levelled the score 1-1.
Moving to Sand River, Action (X) was coming as the Adelaide team charged two Kranvagns and two M-V-Y’s to the two flag. Caught on rotation, the Sentinels scrambled to get reset shots but a fantastic flank from DeL forced Action X to re-push despite being down HP. A few over-extensions saw the brawl become close but ultimately with Val in a one vs three it was a hard fight to win and the Sentinels closed out the win comfortably.
Action X brought out an unusual tank pick for defence, a Strv 103B! The Sentinels realised the potential danger of blind pushing and made a methodical advance through the south, leaving Rowendy to proximity spot Val in the Kranvagn. The push eventually came out through both the middle and 9 line at the same time, with Val getting swiftly eliminated, but not before setting Rowendy on fire. With only a Strv 103B and a STB-1, Action X appeared to be outnumbered, outmatched and out of luck, but the miracle occurred when the Sentinels pushed the 0 line towards the Strv. With Sentinels bleeding hard on the crossing, Rainbow attempted to flank CJ’s Strv but was unable to close out the kill without bleeding a lot of HP in the process. With the HP firmly in Action X’s favour, Dongerlord farmed the remaining Sentinels before retreating and playing for time. With the victory claimed by Action X, we arrived at our third tiebreaker for the evening.
Fortune favours the bold and Action X were rewarded on Prokhorovka attack, with a decisive salvo ammo-racking TheReturned in the opening seconds of the game. Action X charged toward the two flag, punishing any resetting tanks hard. Relying on Rainbow’s T-100 to get reset shots, the Sentinels seemed at a loss on how to proceed. Despite getting a zero second reset shot, the Sentinels lost Rainbow as he retreated and from there it was all over for the Sydney-siders as Action X took map control and continued the cap pressure for a convincing tiebreak victory.
Week Seven Leaderboard
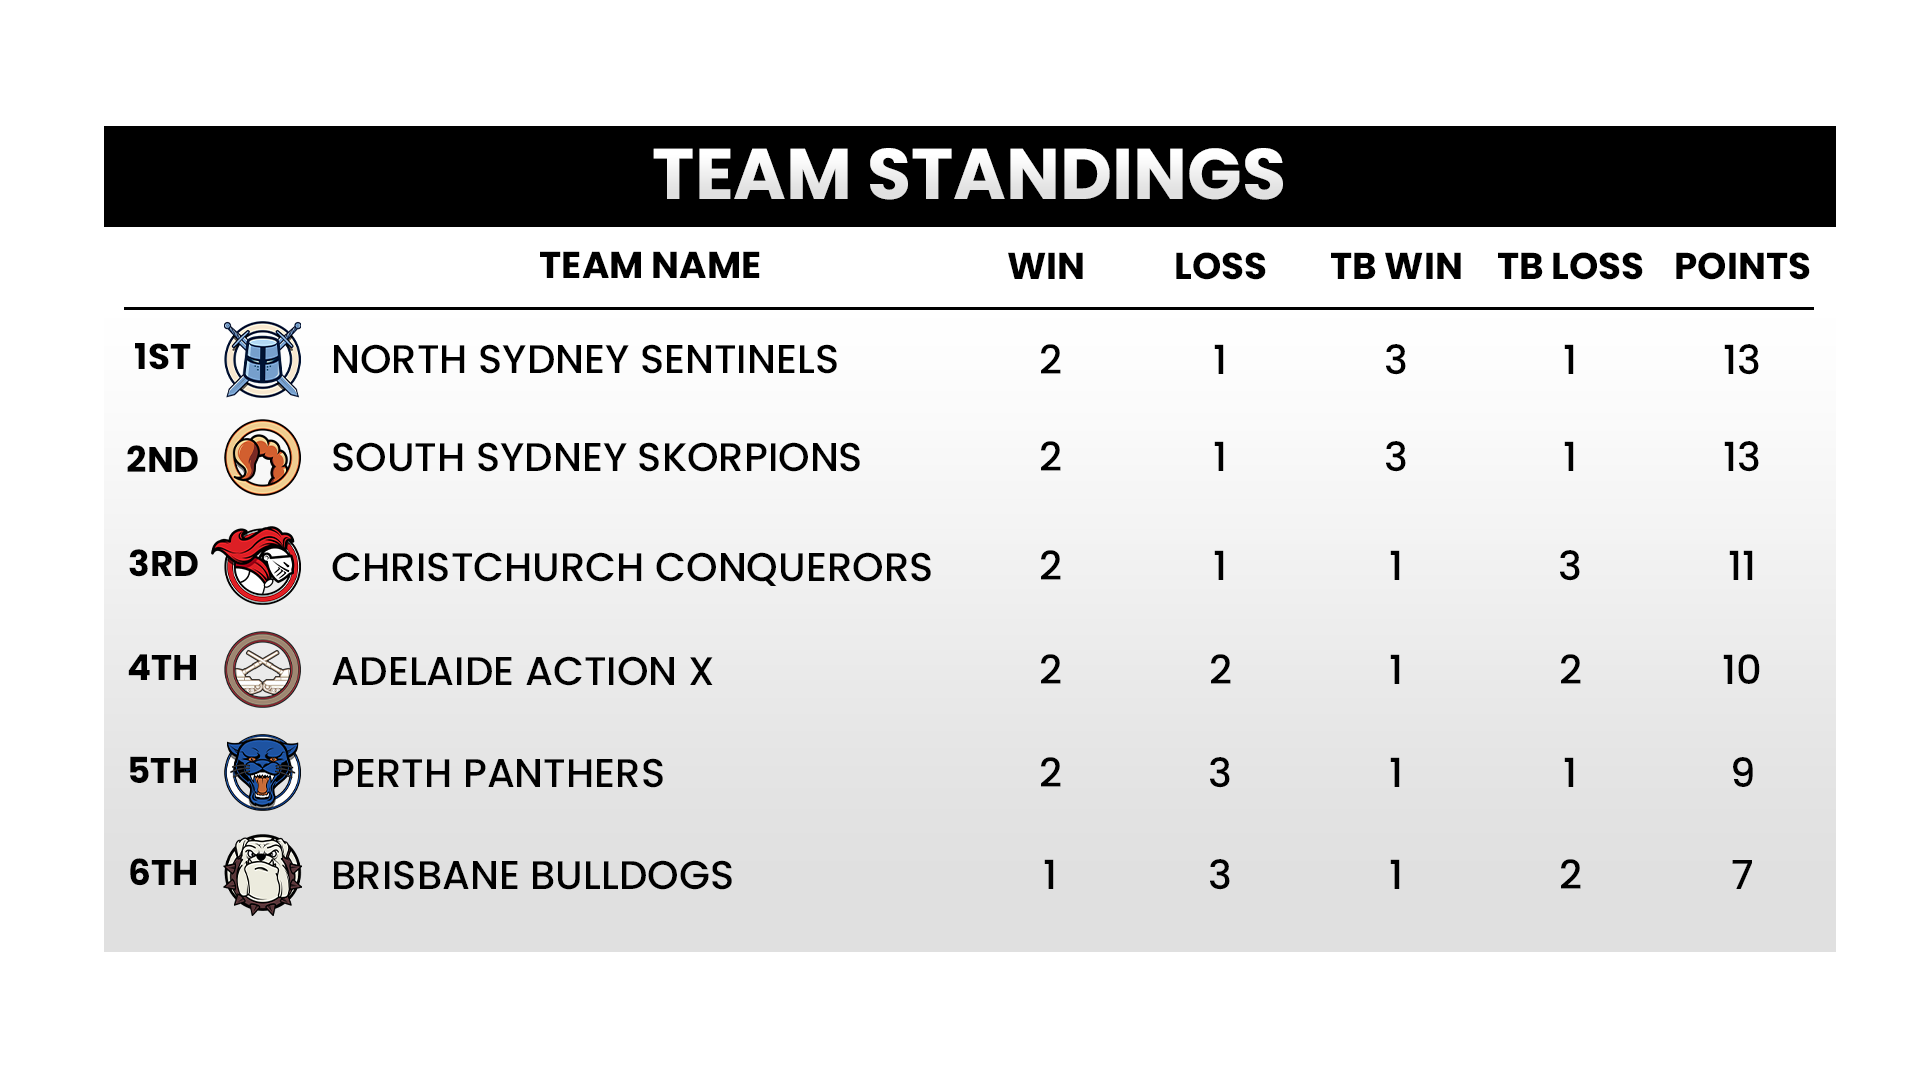
Weeks Seven sees the Sentinels clinging onto the top spot while the Skorpions remain hot on their heels followed by the Conquerors in third while Action X now take fourth place after their upset win agains the Sentinels!
Upcoming Matches
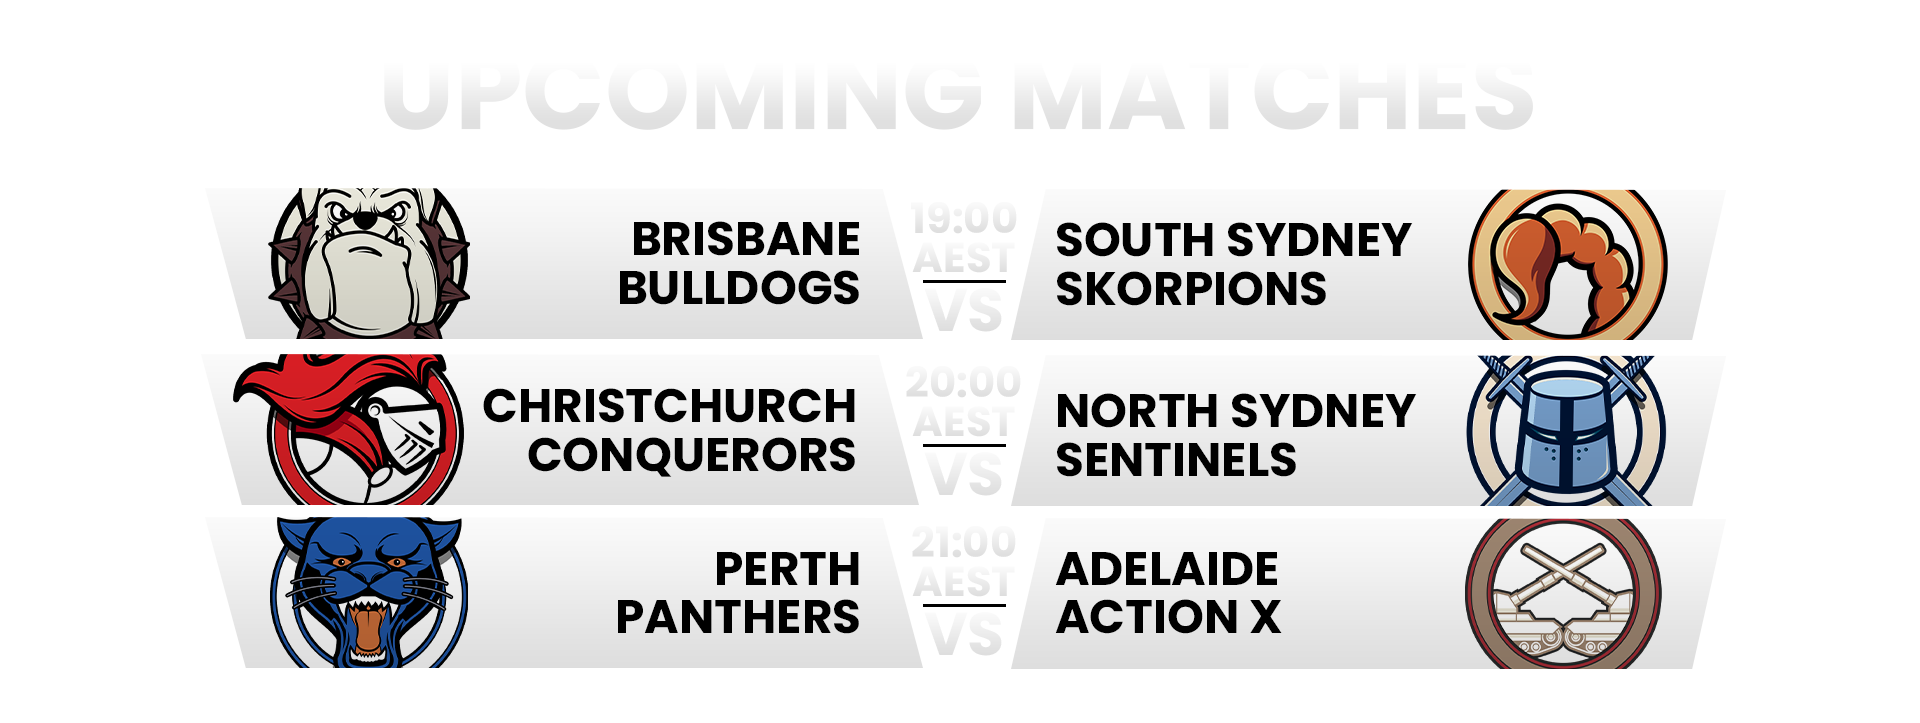
Tomorrow's matches will see the Bulldogs up against the Skorpions followed by the Conquerors facing off against the Sentinels and lastly the Panthers going head to head with Action X.
Fantasy League Team of the Week
For our avid ANZFL fans, here is the best performing team of five for week one with a maximum of 1,681.7 points based on a starting lineup of five. Don't forget to create your team for tomorrow's games!

ANZBL Summary
Joining us this week in the commentary box was ANZPL Superstar Whippet. With the showdown between the top two teams looming, the stage was set for another incredible night of ANZBL!
Auckland Archers vs Canberra Centurions
With the Kiwi team unable to get a point on the scoreboard in previous weeks, the Auckland Archers looked ready to turn the tables against the Centurions with some unconventional tactics. The Archers opened with a controlled advance on the 4 line, gaining great map control. Unfortunately, with their Obj 277 getting spotted coming out from the forest, the Centurions were able to over-poke and farm out the Archers before the Obj 277 was able to get into the fight.
Match two saw the Centurions utilise a hyper-aggressive attack onto the one flag, with two Kranvagns applying cap pressure and two Obj. 277s and a TVP T 50/51, blitzing down the 1 line. The push managed to shut down Taney_Local’s Kranvagn. Meanwhile the Centurions also identified the repush Archers were trying to make on the 4 line and got two Kranvagn clips into Kiwi_Nightmare’s S. Conqueror. Some positional mistakes from the Archers saw Rameka get taken out before toddy was able to flank around to the 4 line and delivering the finishing crossfire and cement the Centurions’ lead.
Shifting to Ghost Town, the Archers went for a very heavy line-up and committed three tanks straight to the two flag. The Centurions were unfazed by this and defended well at E5 before rotating an IS-7 and Bat-Chat through the F line to pincer the attackers on the flag. With the HP firmly in their favour, the Centurions pushed onto the capture circle and eliminated all the Archers in quick succession. Once again the Archers were sent back to the drawing board to rethink their tactics with the Centurions securing a 3-0 victory.
Looking to claim a perfect victory, the Centurions brought out a double Bat-Chat to out-rotate the Archers. Toddy’s S. Conqueror was detected in a position where he was isolated and the Archers saw their chance to pounce before the Batchats arrived. Unfortunately, after eliminating Toddy, the next target seemed to be incredibly indecisive with the Archers bleeding a lot of HP as they made a decision. This gave the Bat-Chats time to reload and the punishing double clip swung the game back in the favour of the Centurions. Another chance to reload was all the pair needed to close out the victory with the Centurions showing a dominant performance.
Bundaberg Badgers vs Hawthorn Hellcats
This week the map pick for Harty’s Hellcats was Ghost Town and the team seemed to have a plan for attack primed and ready to roll. With an Obj. 277 in the south to protect against a repush, an IS-7 on the cap to provide pressure, a S. Conqueror to provide fire support and two E100s ready in ambush, the Hellcats were ready to spring the trap when the Badgers looked to reset. Unfortunately, the E100s got spotted early which prompted the Badgers to rush an isolated G4tekeep3r in the south. The Hellcats responded by applying triple cap pressure with the HP being relatively even. It all turned south when one of the E100s disconnected, leaving the Hellcats in a three vs five brawl. Despite connecting back and getting his gun in the game, Buff_Hamster was left in a one vs three scenario, and the Badgers secured the first match.
Both teams opted for a Bat-Chat in the second match, with Bubbles forcing away his rival in A4 with the threat of being clipped out. G4tekeep3r tried to return and get a clip out but a few missed shots left the Badgers in a comfortable lead. With three tanks on the one flag, the Hellcats panicked to get a reset, charging Rippon into four tanks. The Badgers capitalised on this and swiftly eliminated him before grouping up and using their numbers to win the overall brawl and secure another victory on Ghost Town.
Moving to the Badger’s map pick of Cliff, Snozzle forgot to wake up as the match started, leaving the team a player down. The Hellcats were quick to secure the hill, but Harty took a huge salvo of damage on the climb up. As Bubbles proceeded to contest it without taking damage, Harty was forced to abandon the hill and join his team in a 9 line push. The Badgers identified this and pushed hard, shredding the Hellcats and securing the 3-0 victory.
Due to technical difficulties, the final match was unable to be broadcast, but the Badgers were able to secure an additional victory and another 4-0 result for the night.
Cairns Comets vs Wollongong Wolverines
This series was by far the most anticipated, with the two teams tied for first facing off in a showdown at last. Straight out the gates, neither team disappointed with both teams committing a double CS-63 to the hill on Comets’ map pick of Mines. Initial trades went in favour of the Comets, forcing the Wolverines to commit their Obj. 277s to the hill to regain control. The Comets were prepared for this and got great bleed on them crossing and the rotated CS-63s joined the two Comets Obj. 277s to push out an isolated Forsaken_Army and Mendicant. With the numbers in their favour, Comets continued the fight and closed out the defence in under two minutes.
The Wolverines opted for a much slower and passive defence, utilising a Maus as a HP blockade in K9 and a UDES 15/16 on the island to spot out any rotations. The Comets secured hill with a S. Conqueror and played slow as well to try and get information as to where the Wolverines set up. Eventually the Comets decided on a one flag cap, with a CS-63 hidden behind a building providing the pressure. Wolverines replied by repushing everything onto the one flag and despite getting a few kills lot a few tanks in the process. With one minute left of the clock and the HP evening out, it could go either way but ultimately Mendicant winning the one vs one in his UDES 15/16 cemented the defensive victory for the Wolverines as the match timed out.
With the scores even, the two teams moved to Ghost Town. The Comets played slow on defence and looked for information but were caught off guard from an aggressive push through the D line from the Wolverines. Getting the pick on AthrunZulla, the Wolverines turned around and set their sights on another elimination, with Flaming in their sights. Despite losing a lot of HP, the death-ball couldn’t be stopped with the Bat-Chat clip proving effective in getting eliminations. As the Wolverines played around the Bat-Chat’s clip, they were able to finish off the remaining Comets and take a 2-1 lead.
Swapping sides, the Comets were now under pressure to level the score. A methodical advance through the south saw the Comets pressure the two flag with three tanks, leaving a S. Conqueror and a Bat-Chat on the flanks to prevent resets. Meanwhile the Wolverines had once again grouped their tanks into D6 and looked to death-ball onto the flag once again. Comets quickly identified that the Wolverines had split and a decisive push saw them take the advantage while the two Bat-Chats duelled it out. With Darkknight coming out on top for the Comets, the Bat-Chat clip was once again the game-winner as the clip isolated the remaining Wolverines, resulting in the first Tiebreaker of the season.
The Wolverines had the advantage going into Tiebreaker and chose to defend on Tundra, using a double VZ.55 in A1 and a S. Conqueror in B2 to set up a trap. The Comets charged right into A4 and identified the trap so they looked to get cap pressure while keeping their double Vz. 55s hidden. Expecting only a lone Obj. 277 ahead, the Wolverines repushed A4 and ran into the ambush set by the Comets. Grouping up, the Comets counter-pushed four tanks and eliminated haha_yes. When the Vzs reloaded the Comets once again striked, this time taking out The_Forsaken_Army and ToasteD. The Wolverines tried to claw back as the autoloading heavies reloaded but it wasn’t enough and the Comets were the champions of the day and claimed the #1 spot on the leaderboard.
Leaderboard
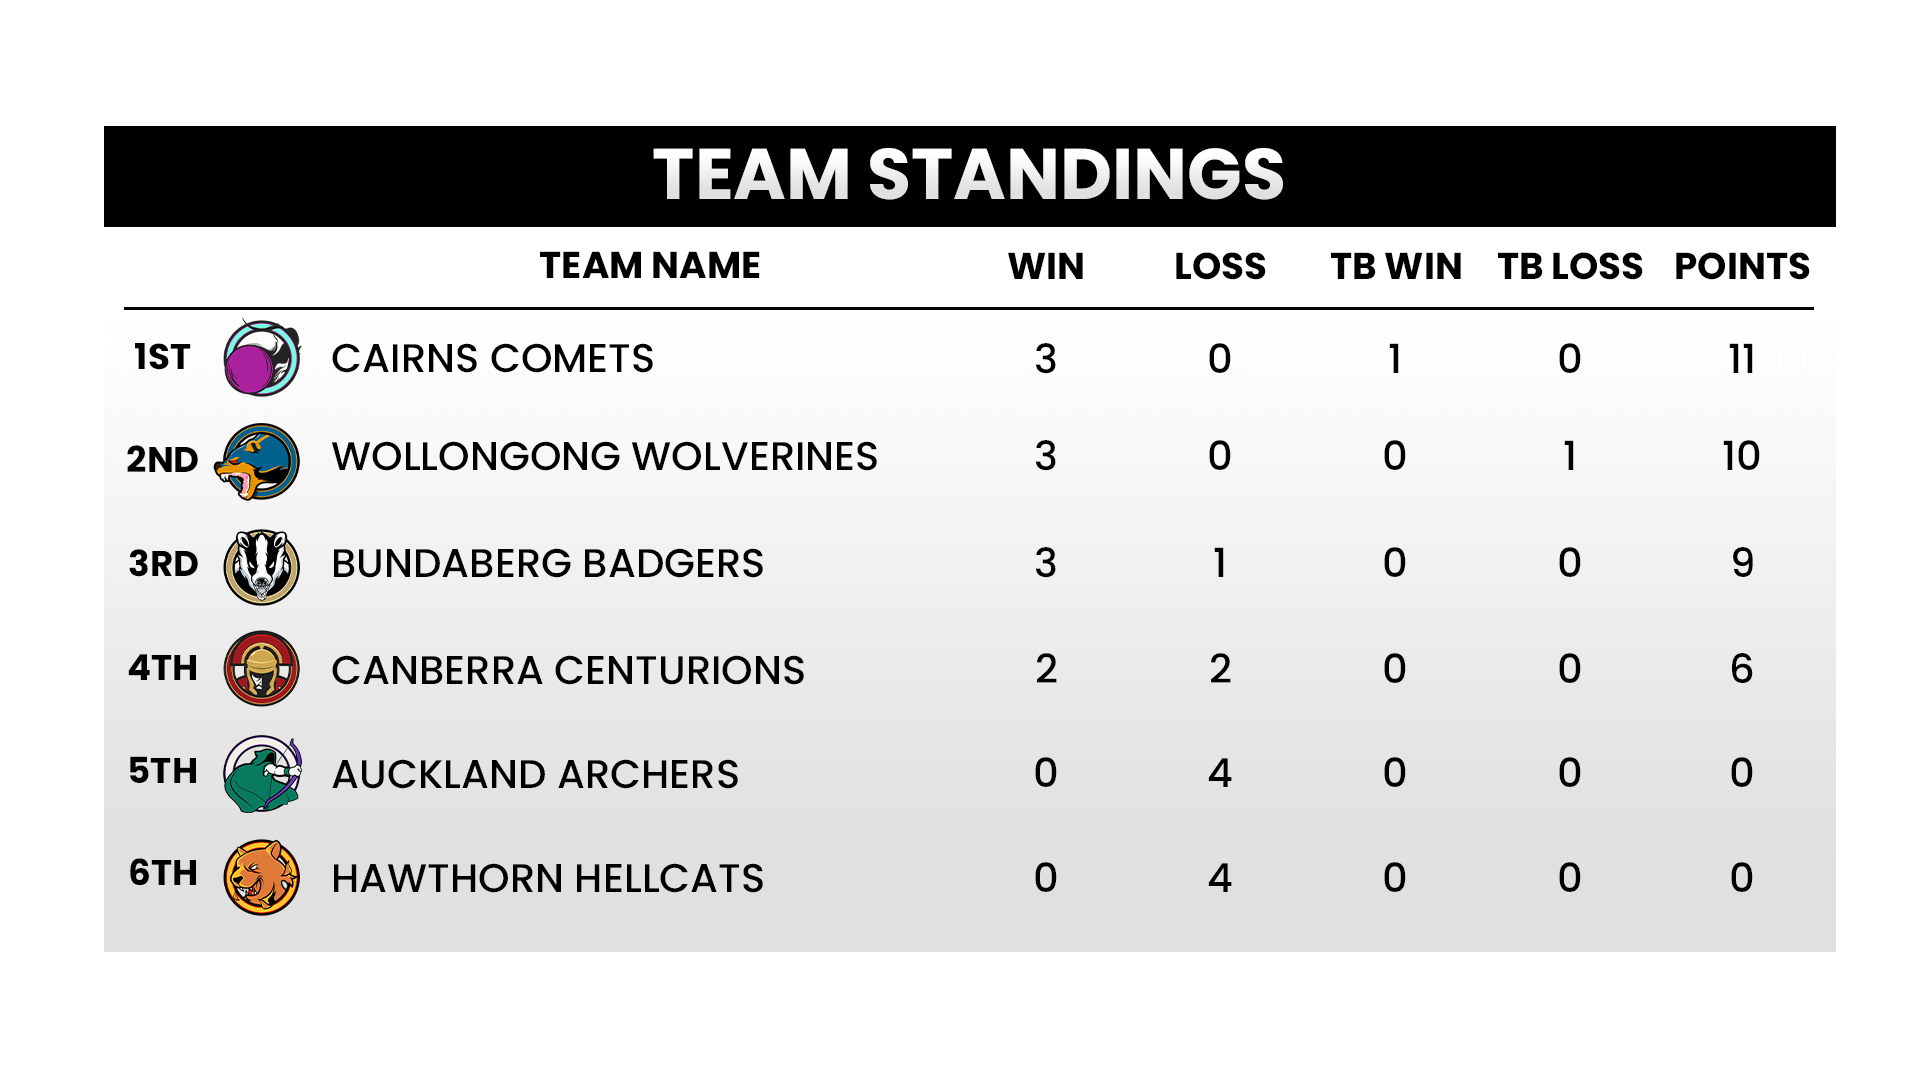
The leaderboard appears relatively unchanged this week but looking at the points we see the Comets inch ahead of the Wolverines by one point while the Badgers begin to close the distance on the two top teams.
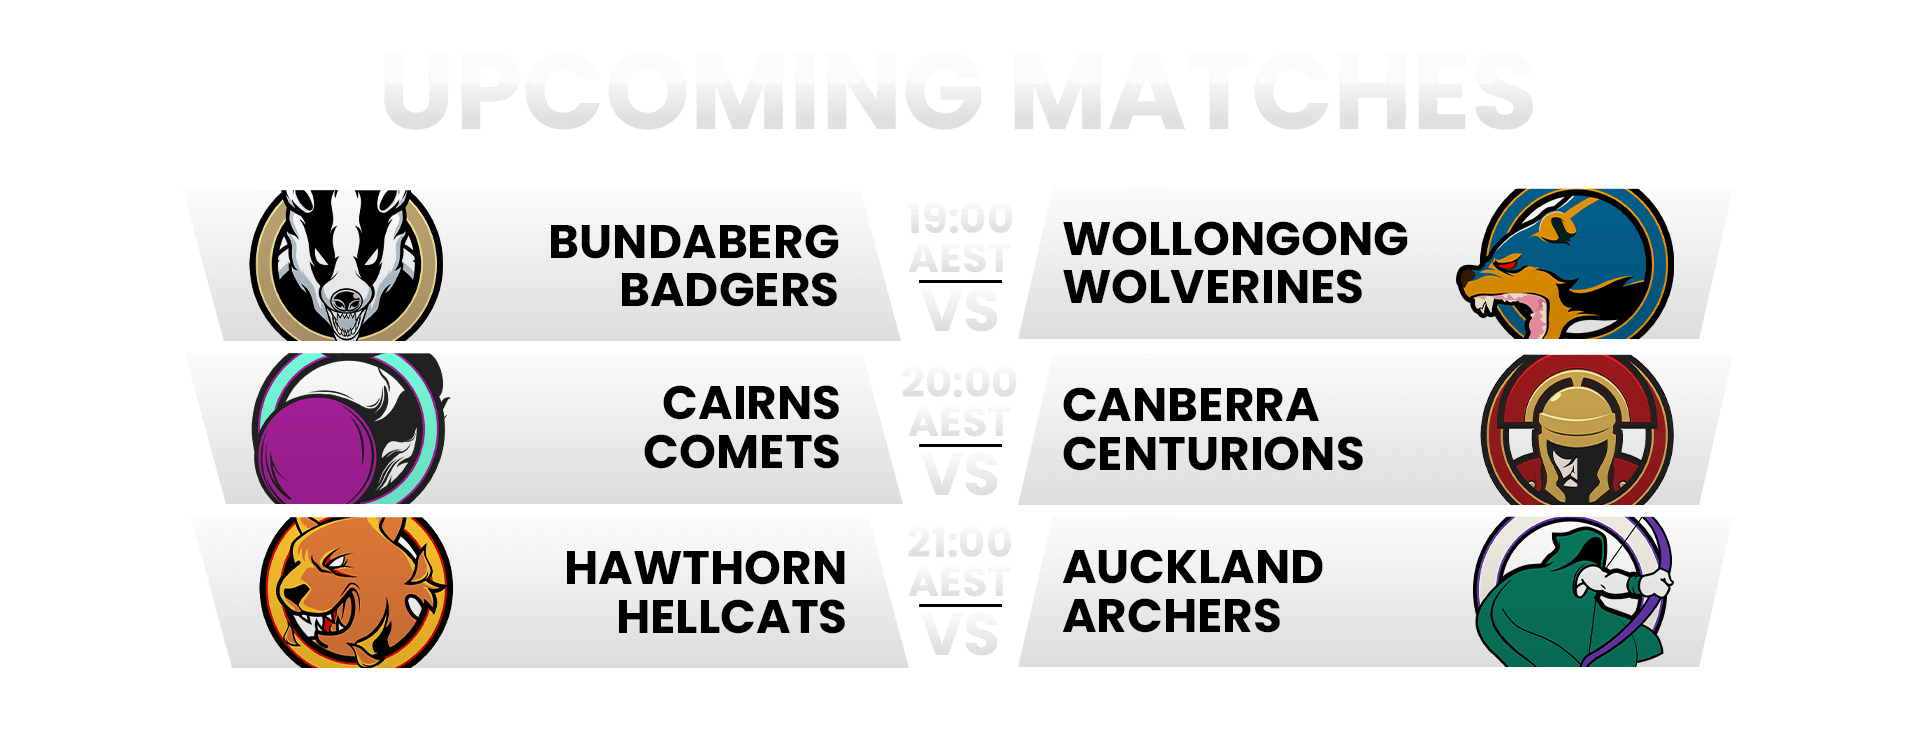
Upcoming Matches
Next weeks matches will see the Badgers up against the Wolverines as they vie for second place followed by the Comets facing off against the Centurions and lastly the Hellcats going head to head with Archers sees a good opportunity for either team to get some points on the board.