The Game Plan: RUN’s Map Attack Part 2 – Mines


Welcome to The Game Plan! A map like Mines requires some careful decision-making with your team beforehand, as there are three main areas to battle for control of, and your choice could very well determine the outcome of the game. Will you stake your claim on the island? Duck for cover between the buildings of the small town? Or attempt to ascend the hill to glory? Let RUN_KuD and RUN_CmcKelviN from RUN walk you through the best routes for each tank class to take!
RUN Facebook: https://www.facebook.com/RUN-1937125896511880/
Be sure to Like and Share =]
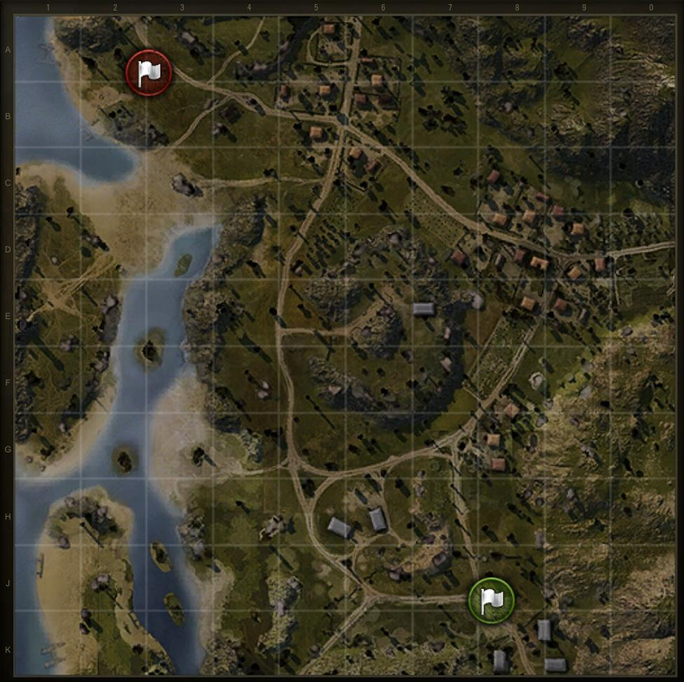
Mines
We've previously covered Himmelsdorf, but today it’s time for us to review Mines!
Mines appears in both high and low tier random battles; newbies and veterans alike should be quite familiar with this map. Mines is also a popular competition map, so it is a good investment to figure out the most common strategies.
This small map can be divided into 3 fronts:
Lanes 1, 2 & 3 – the Island; Lanes 4, 5 & 6 – the Central Hill; Lanes 7, 8, 9 & 0 – the Town.
Central Hill (Lanes 4-6) is the main focus. To get the initiative, faster vehicles will use their speed and momentum to push up the hill. From there, they can shoot down and support other flanks. If you can’t/don’t want to join the initial thrust, you can stick around and snipe enemies above while staying in cover among the rocks. Providing covering fire for your teammates while they steadily form up a new offensive is another good way to secure the hill.
The Island (Lanes 1-3) can be utilized to suppress enemies lingering below the hills in ambush. Use the rocks and bushes to set up your own ambush, or bide your moment to attack. Be aware that traversing on the water will slow your tank down, making it easy prey for the other team.
The Town (Lanes 7-0) is a flanking route. When supported by allies on the hill and utilizing cover, a breakthrough can often be achieved here. If your team is being overrun, structures here can be used to slow down the enemy advance, or as cover for an organized retreat.
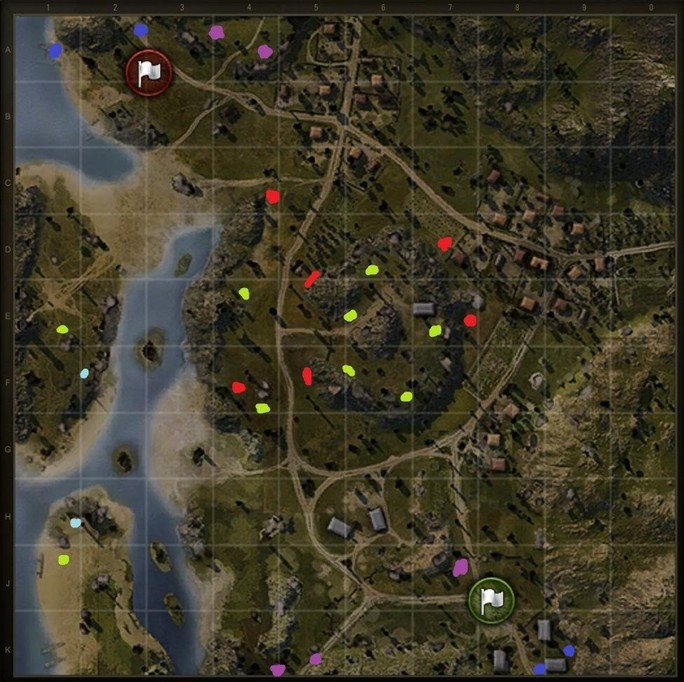
Heavy Tanks (Red)
Heavies should remain near the centre to support allies and prevent enemies from reaching the hill. Suppress the hill using hull-down tactics while conserving health, then advance toward the strategic points later into the game. If SPGs become a problem, it is okay to yield ground a bit. Heavies can also choose to go into town, where they can either spearhead an assault or delay the enemy's advance, depending on the tactical needs of the situation.
Medium Tanks (Green)
Tactics for mediums are a lot more flexible, since they have the mobility to support other lanes. If you have confidence in your tank’s speed, rush the hill and harass the enemy by peeking out from different angles. When rushing, avoid collisions that will slow you down and render you an easy target. Another tactic is to head for the island and snipe behind the bush, then go support other lanes that are in need.
Light Tanks (Light Blue)
Light tank tactics for Mines are similar to mediums' due to the lack of scouting positions. If you want to take the hill, examine the enemy's line-up before doing so - don’t rush in if the enemy's line-up is more powerful, or it could be suicide for you. Some tactics to consider are: Follow your medium tanks to form a powerful wolf pack; use your mobility to pop out from hills or terrain to harass TDs; when the situation allows, assault enemy bases and SPGs.
Tank Destroyers (Purple)
Use stealth to your advantage - snipe and support your team from rocks, bushes, and other cover. Focus on providing cover for the 3 fronts, and beware of counter-ambushes. If your TD’s armor allows it, assist the heavies in holding the line, but don’t get in their way.
Self-Propelled Guns (Blue)
Thanks to the small map size, SPGs will be able to rain down fire support to virtually every location on the map. But that also means you can be easily spotted and are susceptible to counter-battery by the enemy! Use concealment and move a bit after each shot, while targeting the central hill to weaken enemy lines, or fire on the enemy TDs to cut off their support (you may be able to finish an enemy TD with one shot due to their weaker armour).
Now, get out there and use the terrain and your map knowledge to your advantage! Happy hunting!